
Vectrex Studio has three editors for 3D assets. All of them check the file as you edit with the compiler's own rules, undo with Ctrl+Z / Ctrl+Y, and keep any JSON fields they don't know when they save.
| Asset | Editor | Folder | Create it with |
|---|---|---|---|
.vmesh | Mesh Editor | assets/meshes/ (any sub-folder) | File → New → 3D Mesh |
.vscene | Scene Editor | assets/scenes/ | File → New → 3D Scene |
.vskel | 3D Animation editor | assets/skeletons/ | File → New → 3D Skeleton |
.vclip | 3D Animation editor | assets/clips/ | File → New → 3D Animation |
From VPy, these assets work on the uvm2 target, and on rp2350 when the program is built through C. From C they build for the simulator, rp2350 and uvm2. The builtins are in 3D in VPy.
Mesh Editor
A .vmesh is a 3D model: vertices and faces, plus optional scenery lines and occluders. It opens in the Mesh Editor.
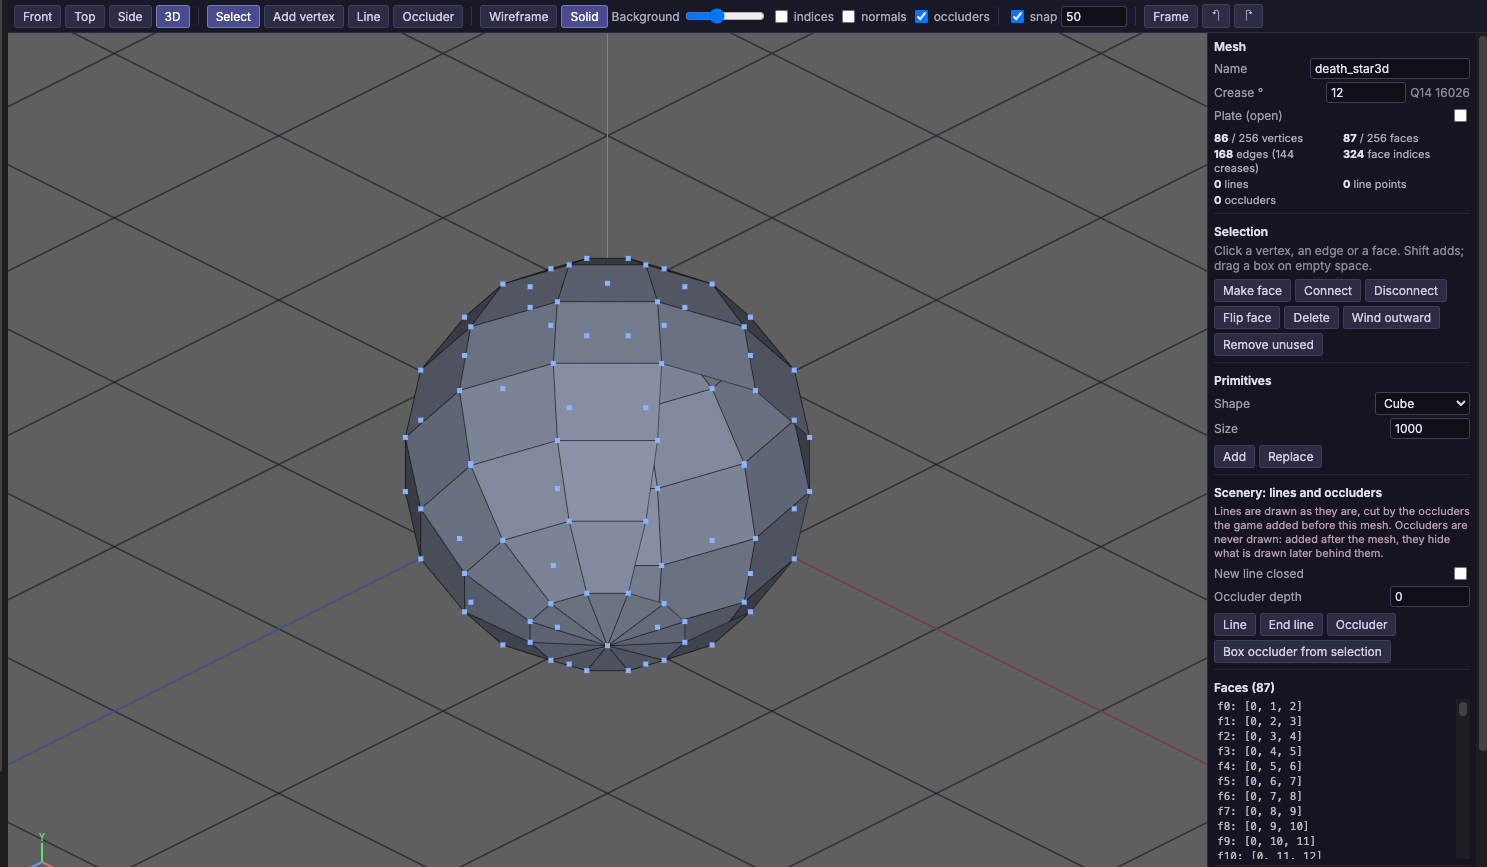
Views
| View | Key | Plane |
|---|---|---|
| Front | 1 | X-Y |
| Top | 2 | X-Z |
| Side | 3 | Y-Z |
| 3D | 4 | Orbiting perspective |
- The middle button pans, middle button + Shift (or Alt + drag, or the right button) orbits, and the wheel zooms to the cursor — the same controls as the Vector Editor's 3D view.
- Free orbit turns around the screen's axes, so you can look at a model from above and below.
- Frame (Home or H) fits the whole mesh in the view.
Display
| Control | Key | What it shows |
|---|---|---|
| Solid | D | Faces filled, far ones first, lit from the viewer, each outlined. Faces are drawn in their own colour when the file has face_colors |
| Wireframe / vpy3d | W | Wireframe shows every edge (smooth edges dashed). vpy3d shows only what the game draws from this angle — creases, silhouettes and rims — with the rest faint |
| Background | — | A grey slider, black to white, shared by every 3D view |
| occluders | — | Shows occluders as a faint orange hull (the game never draws them) |
Editing vertices and faces
| Tool or action | Key | Use |
|---|---|---|
| Select | S | Click, Shift-click or drag a box to select vertices; drag to move them. Click inside a face to select it |
| Add vertex | A | Click on the view plane; new vertices join the selection in order |
| Make face | F | A face from the selected vertices, in the order you selected them |
| Connect | J | Split a face along a new edge between two of its corners |
| Disconnect | K | Remove the edge between two vertices, merging the faces either side |
| Flip face | N | Reverse the winding of the selected face |
| Delete | Delete | Delete the selected vertices (and their faces), points or face |
| Wind outward | — | Re-wind every face anticlockwise seen from outside |
| Remove unused | — | Delete vertices no face uses |
| Nudge | Arrows | Move the selection 1 unit (10 with Shift) |
Vertices also take numeric X/Y/Z in the side panel, and Snap keeps moved and added vertices on the grid in the front, top and side views.
Dissolving edges. With Select, click an edge to pick it (Shift adds more), then press Delete: the faces either side become one, keeping their colours.
Primitives
The Primitives section adds a cube, pyramid, grid or cylinder at the origin. Add puts it next to what is there; Replace replaces the whole mesh (after a confirmation).
Lofted meshes
A mesh can be lofted from cross-sections instead of listing vertices and faces: every section is a ring of points at a z, or takes its ring from a path of a .vec. Every section needs the same point count. The editor previews a lofted file read-only. Convert to vertices + faces replaces the sections with the faces they loft into, so you can edit them. Scenery lines and occluders stay editable in a lofted file.
Scenery: lines and occluders
A .vmesh can also be a piece of scenery — a room, a corridor section — with or without faces.
| Tool | Key | Use |
|---|---|---|
| Line | L | Click points on the view plane (or onto a vertex or point). Enter or a double-click ends the line, Esc cancels |
| Occluder | O | Drag a box occluder on the front, top or side view |
| Box occluder from selection | B | An occluder that is the bounding box of the selected vertices and points |
- Lines are polylines of 2 to 255 points, never culled, drawn at
brpercent (1–100) of the mesh's brightness.closed: truejoins the last point to the first. - Occluders are invisible convex solids of 3 to 8 corners. They hide whatever is drawn after the mesh, never the mesh's own lines.
- Their points select, drag, nudge and delete like vertices; clicking a line or an occluder outline selects all of it.
The preview does not cut lines by occluders and does not show fog.
The format
{"name":"cube","hard":45,
 "vertices":[{"x":-500,"y":-500,"z":-500},{"x":500,"y":-500,"z":-500}, ...],
 "faces":[[0,3,2,1],[4,5,6,7], ...]}
hard is the crease angle in degrees, and open: true makes a plate instead of a solid. A scenery mesh adds lines and occluders:
{"name":"hall",
 "lines":[{"points":[{"x":-3000,"y":280,"z":1800},{"x":3000,"y":280,"z":1800}],"br":70}],
 "occluders":[{"points":[ ...3 to 8 corners of a convex solid... ]}]}
Scenery points may be 32-bit (±1,000,000); vertices keep the 16-bit range. A file with lines or occluders needs SDK v1.3.5 or later.
Using it from VPy: LOAD_MESH("cube") once, then DRAW_MESH("cube", xf, brightness) every frame — see 3D in VPy.
Using it from C: #include "cube.h" for CUBE_vmesh, then vpy3d_load_mesh(&cube, CUBE_vmesh) and vpy3d_draw_mesh(&cube, &place, 127); add $(VPY_C_SDK)/vpy3d.c to the sources — see vpy3d.
Scene Editor
A .vscene arranges .vmesh pieces into a 3D set: the ribs of a tunnel coming at you every 2000 units, two ranges of hills sliding by at different speeds, the stripes of a floor. Each frame the game passes one position, pos — how far it has gone along x, y and z — and the scene places every piece from it.
File → New → 3D Scene creates assets/scenes/<name>.vscene with one piece, the first mesh in assets/meshes, so make a mesh first.
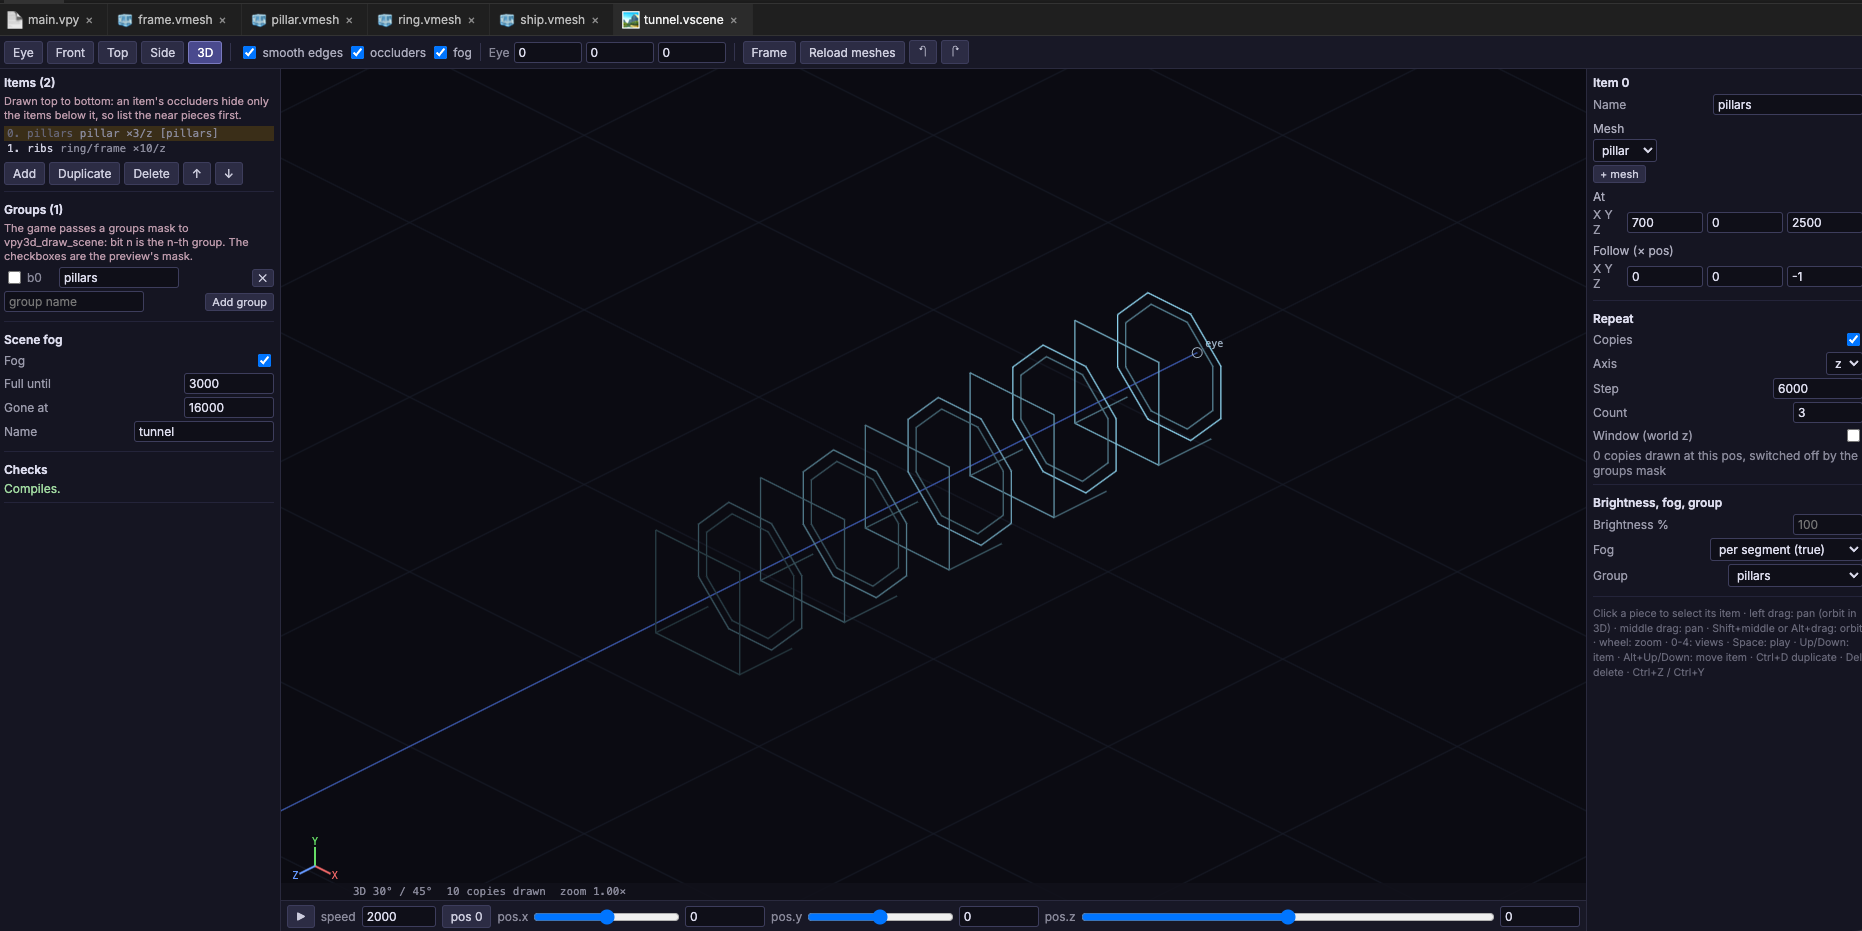
Three columns
- Left — items and groups. The items in draw order: add, duplicate, delete, move up and down. Below them, the groups (add, rename, delete) and the scene fog (on/off,
full,gone). - Middle — preview. Places every copy with the runtime's own arithmetic for a preview
pos, set with the x/y/z sliders. ▶ (or Space) advancespos.z, so you can watch a repeat scroll and wrap. Views: Eye (a perspective from an editable point, looking along +z), front, top, side and an orbiting 3D view. Click a piece to select its item; the selected item is orange. - Right — the selected item. Its name, mesh (or a list of meshes),
at,follow, repeat, window, brightness, fog and group.
In the preview, face edges are green (smooth edges faint), scenery lines are drawn at their brightness and occluders show as a faint orange hull. The group checkboxes in the left column form the groups mask.
Draw order and occluders
Items are drawn in the order listed. A piece's occluders hide only the items after it, so list the near pieces first. When a frame has more strokes than the stroke buffer holds, the strokes drawn last are dropped — one more reason to put far pieces last.
Item fields
| Field | What it does |
|---|---|
mesh | A .vmesh name, or a list of meshes that take turns along a repeat. At most 16 different meshes per scene |
at | Where the piece stands (x, y, z; a missing axis is 0) |
follow | How far the piece moves per unit of pos, per axis. {"z": -1} comes at you as you advance; a fraction makes far scenery slide slowly (kept to 1/65536) |
repeat | count copies step apart along axis; they wrap with the movement, so there are always count of them |
window | Draw a copy only while its world z is within min..max (each optional) |
br | Percent (1–100) of the brightness passed to the draw call |
fog | true fades each line segment by depth; "whole" fades each copy as one, faces too; false leaves it unfaded |
group | Draw only while the game sets that group's bit; "!name" the other way round. Up to 32 groups |
Renaming a group renames it in every item that uses it; deleting a group makes those items always draw. Reload meshes reads the .vmesh files again after you change them. A mesh lofted from .vec sections is not previewed here: open it in the Mesh Editor.
The format
{"name":"tunnel",
 "fog":{"full":3000,"gone":17500},
 "groups":["alarm"],
 "items":[
   {"name":"ribs","mesh":"tunnel_rib","at":{"z":600},"follow":{"z":-1},
    "repeat":{"axis":"z","step":2000,"count":9},"fog":"whole"},
   {"name":"wall panels","mesh":["panels_high","panels_low"],"at":{"z":600},
    "follow":{"z":-1},"repeat":{"axis":"z","step":2000,"count":9},"window":{"max":10999}},
   {"name":"long edges","mesh":"tunnel_edges","fog":false},
   {"name":"red lights","mesh":"alarm_lights","group":"alarm"}]}
.vscene needs SDK v1.3.5 or later.
Using it from VPy: LOAD_SCENE("tunnel") once, then DRAW_SCENE("tunnel", x, y, z, brightness, groups) or DRAW_SCENE_AT(...) every frame — see 3D in VPy.
Using it from C: #include "tunnel.h" for TUNNEL_vscene and TUNNEL_vscene_meshes, then vpy3d_load_scene(&s, TUNNEL_vscene, TUNNEL_vscene_meshes) and vpy3d_draw_scene(&s, place, pos, groups, br) — see vpy3d.
3D Animation editor
.vskel skeletons and .vclip libraries of poses and clips open in one editor. (.vanim is separate: it is a flipbook of 2D frames, edited in the Animation Editor.)
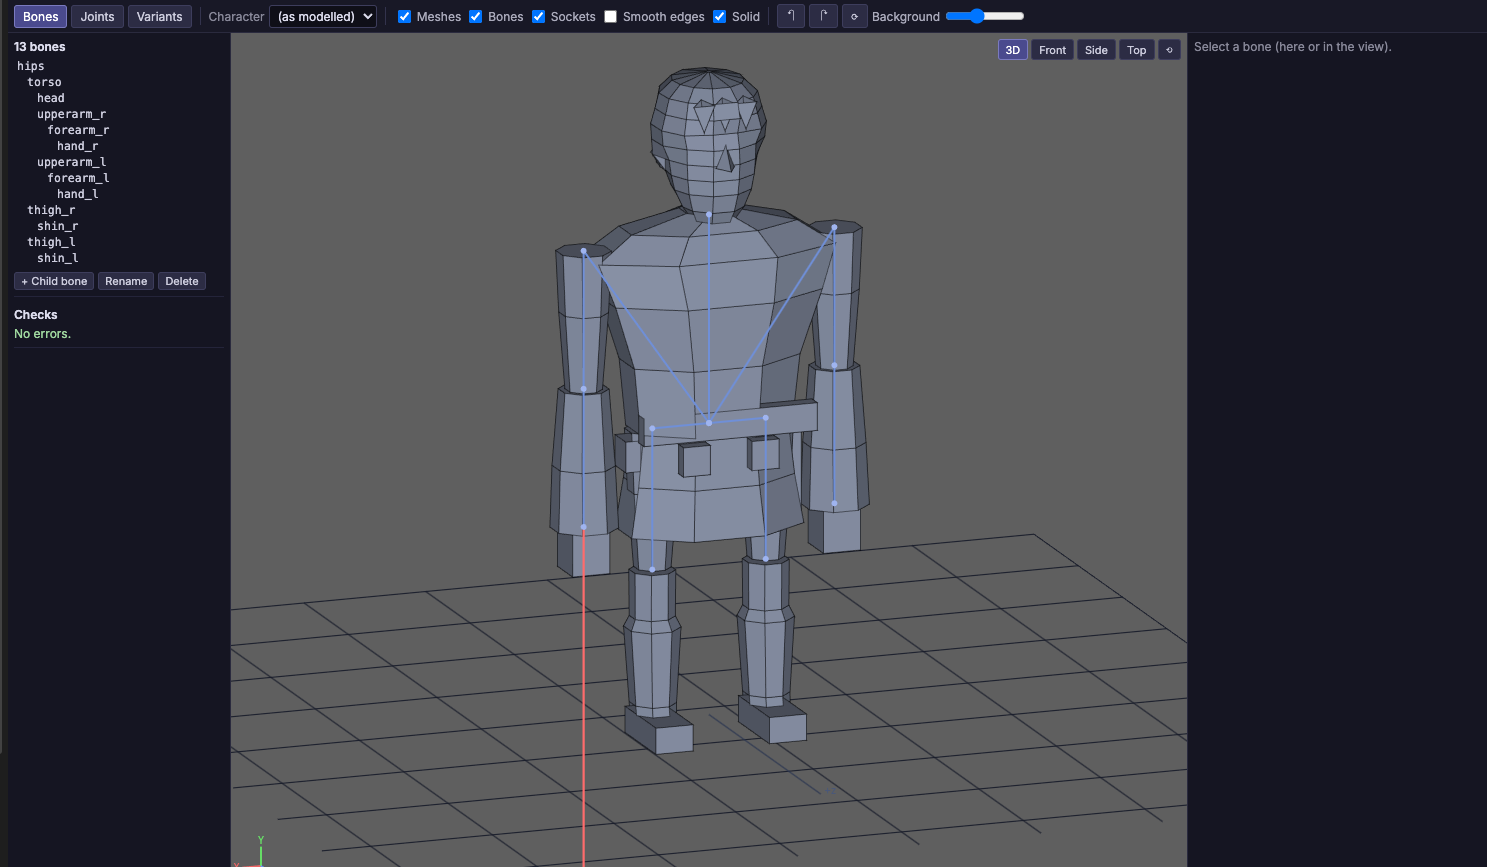
The view
The view draws the character the way the console draws it: hard edges facing the camera and the outlines of smooth surfaces, with the bones in blue and the sockets in red.
- Smooth edges shows every edge, faint. Solid fills the faces, as in the Mesh Editor, and the background-grey slider is shared with it.
- Character picks one of the skeleton's variants. Toolbar checkboxes turn meshes, bones and sockets on and off.
- 3D, Front, Side and Top show a character facing +z. Dragging orbits, Shift or middle drag pans, the wheel zooms, and clicking a joint selects its bone.
- The skeleton and meshes are read from
assets/skeletonsandassets/meshes; ⟳ reads them again.
A skeleton: Bones, Joints, Variants
| Tab | What you edit |
|---|---|
| Bones | The tree. A bone has its parent, its offset, its mesh and its turns (axis, joint, mul, div, add), plus the sockets fixed to it |
| Joints | Names and optional limits, plus test sliders that pose the skeleton without saving anything |
| Variants | The scale, and a mesh and an offset per bone. A variant's extra bones, rotations and sockets are listed but edited as text |
Bones are rigid and each carries one .vmesh. Joints are single named angles that turn the bones, so a pose made for one character fits every character on the same skeleton. Sockets are named segments on a bone — what a hand holds, where a shot leaves.
{
  "version": 1,
  "angle_unit": 4096,
  "joints": [ { "name": "twist" }, { "name": "lean" }, { "name": "elbow_r" } ],
  "bones": [
    { "name": "hips",  "parent": null,   "offset": [0, 950, 0], "mesh": "hips", "rotate": [] },
    { "name": "torso", "parent": "hips", "offset": [0, 0, 0],   "mesh": "torso",
      "rotate": [ { "joint": "twist", "axis": "y" }, { "joint": "lean", "axis": "x" } ] },
    { "name": "head",  "parent": "torso", "offset": [0, 680, 0], "mesh": "head",
      "rotate": [ { "joint": "twist", "axis": "y", "mul": -1, "div": 2 } ] }
  ],
  "variants": {
    "giant": { "scale": 282, "meshes": { "head": "helmet", "torso": "armour" } },
    "small": { "scale": 72,  "meshes": { "head": "round_head" }, "offsets": { "head": [0, 640, 0] } }
  }
}
angle_unit is angles per turn; each turn's angle is joint * mul / div + add in integer arithmetic. A variant's scale is Q8 (256 = as modelled).
A clip library: Poses, Clips, Sets
| Tab | What you edit |
|---|---|
| Poses | The list of poses, and one slider per joint, in degrees and in the file's own units. The editor warns when a pose is shared by several clips or sets. Clicking a joint's name finds its bone in the view |
| Clips | The keys (a pose at a frame), the marks (a named instant with an optional value), the loop flag and the clip's whole-number properties |
| Sets | Per character or style: the pose for each stance, the clip for each role (▶ plays it) and the set's own numbers |
The timeline under the view plays the clip at the game's 50 frames a second (Space or ▶, slower speeds too), scrubs with a click, and moves a key when you drag it.
- + Key at frame n adds a key at the playhead.
- + New pose here turns what the view shows into a new pose keyed there.
- Ghost draws the last key passed, faintly.
- Selecting a key shows its pose's sliders.
Between keys the preview moves in straight lines; how the game eases between them is up to the game.
{
  "version": 1,
  "skeleton": "humanoid",
  "poses": {
    "guard":    { "twist": 227, "lean": 136, "elbow_r": 796 },
    "cut_wind": { "twist": -341, "lean": 56, "elbow_r": 455 }
  },
  "clips": {
    "slash": {
      "keys": [ { "frame": 0, "pose": "guard" }, { "frame": 4, "pose": "cut_wind" },
                { "frame": 12, "pose": "guard" } ],
      "loop": false,
      "props": { "damage": 1, "lunge": 60 },
      "marks": [ { "frame": 4, "name": "strike" } ]
    }
  },
  "sets": {
    "duelist": { "poses": { "guard": "guard" }, "clips": { "slash": "slash" },
                 "props": { "stance": 90 } }
  }
}
Renaming and errors
Renaming a pose, a clip, a bone or a joint renames it wherever the same file uses it. Deleting one that is still used is refused, and the message names the users. Renaming a joint in a .vskel does not rename it in the .vclip files that pose it. Errors show on the left as you edit.
Using it from VPy: import humanoid (the .vskel) or import moves (the .vclip) reads the file as constant tables — moves.T_POSES[moves.POSE_GUARD][moves.JOINT_TWIST] — and you build the character with BONE_ADD. See 3D in VPy.
Using it from C: #include "gen/moves.h" (built with vpy_cli compile-asset moves.vclip --format c; a new C project's Makefile has the rule) gives the same tables with the library's prefix, MOVES_T_POSES[MOVES_POSE_GUARD][MOVES_JOINT_TWIST], for vpybone — see Animation.