The Playground is a full visual level editor. Open it from the activity bar and use ✨ New / 💾 Save / 📁 Load to manage .vplay files. Levels saved here are referenced in VPy code with LOAD_LEVEL("scene_name").
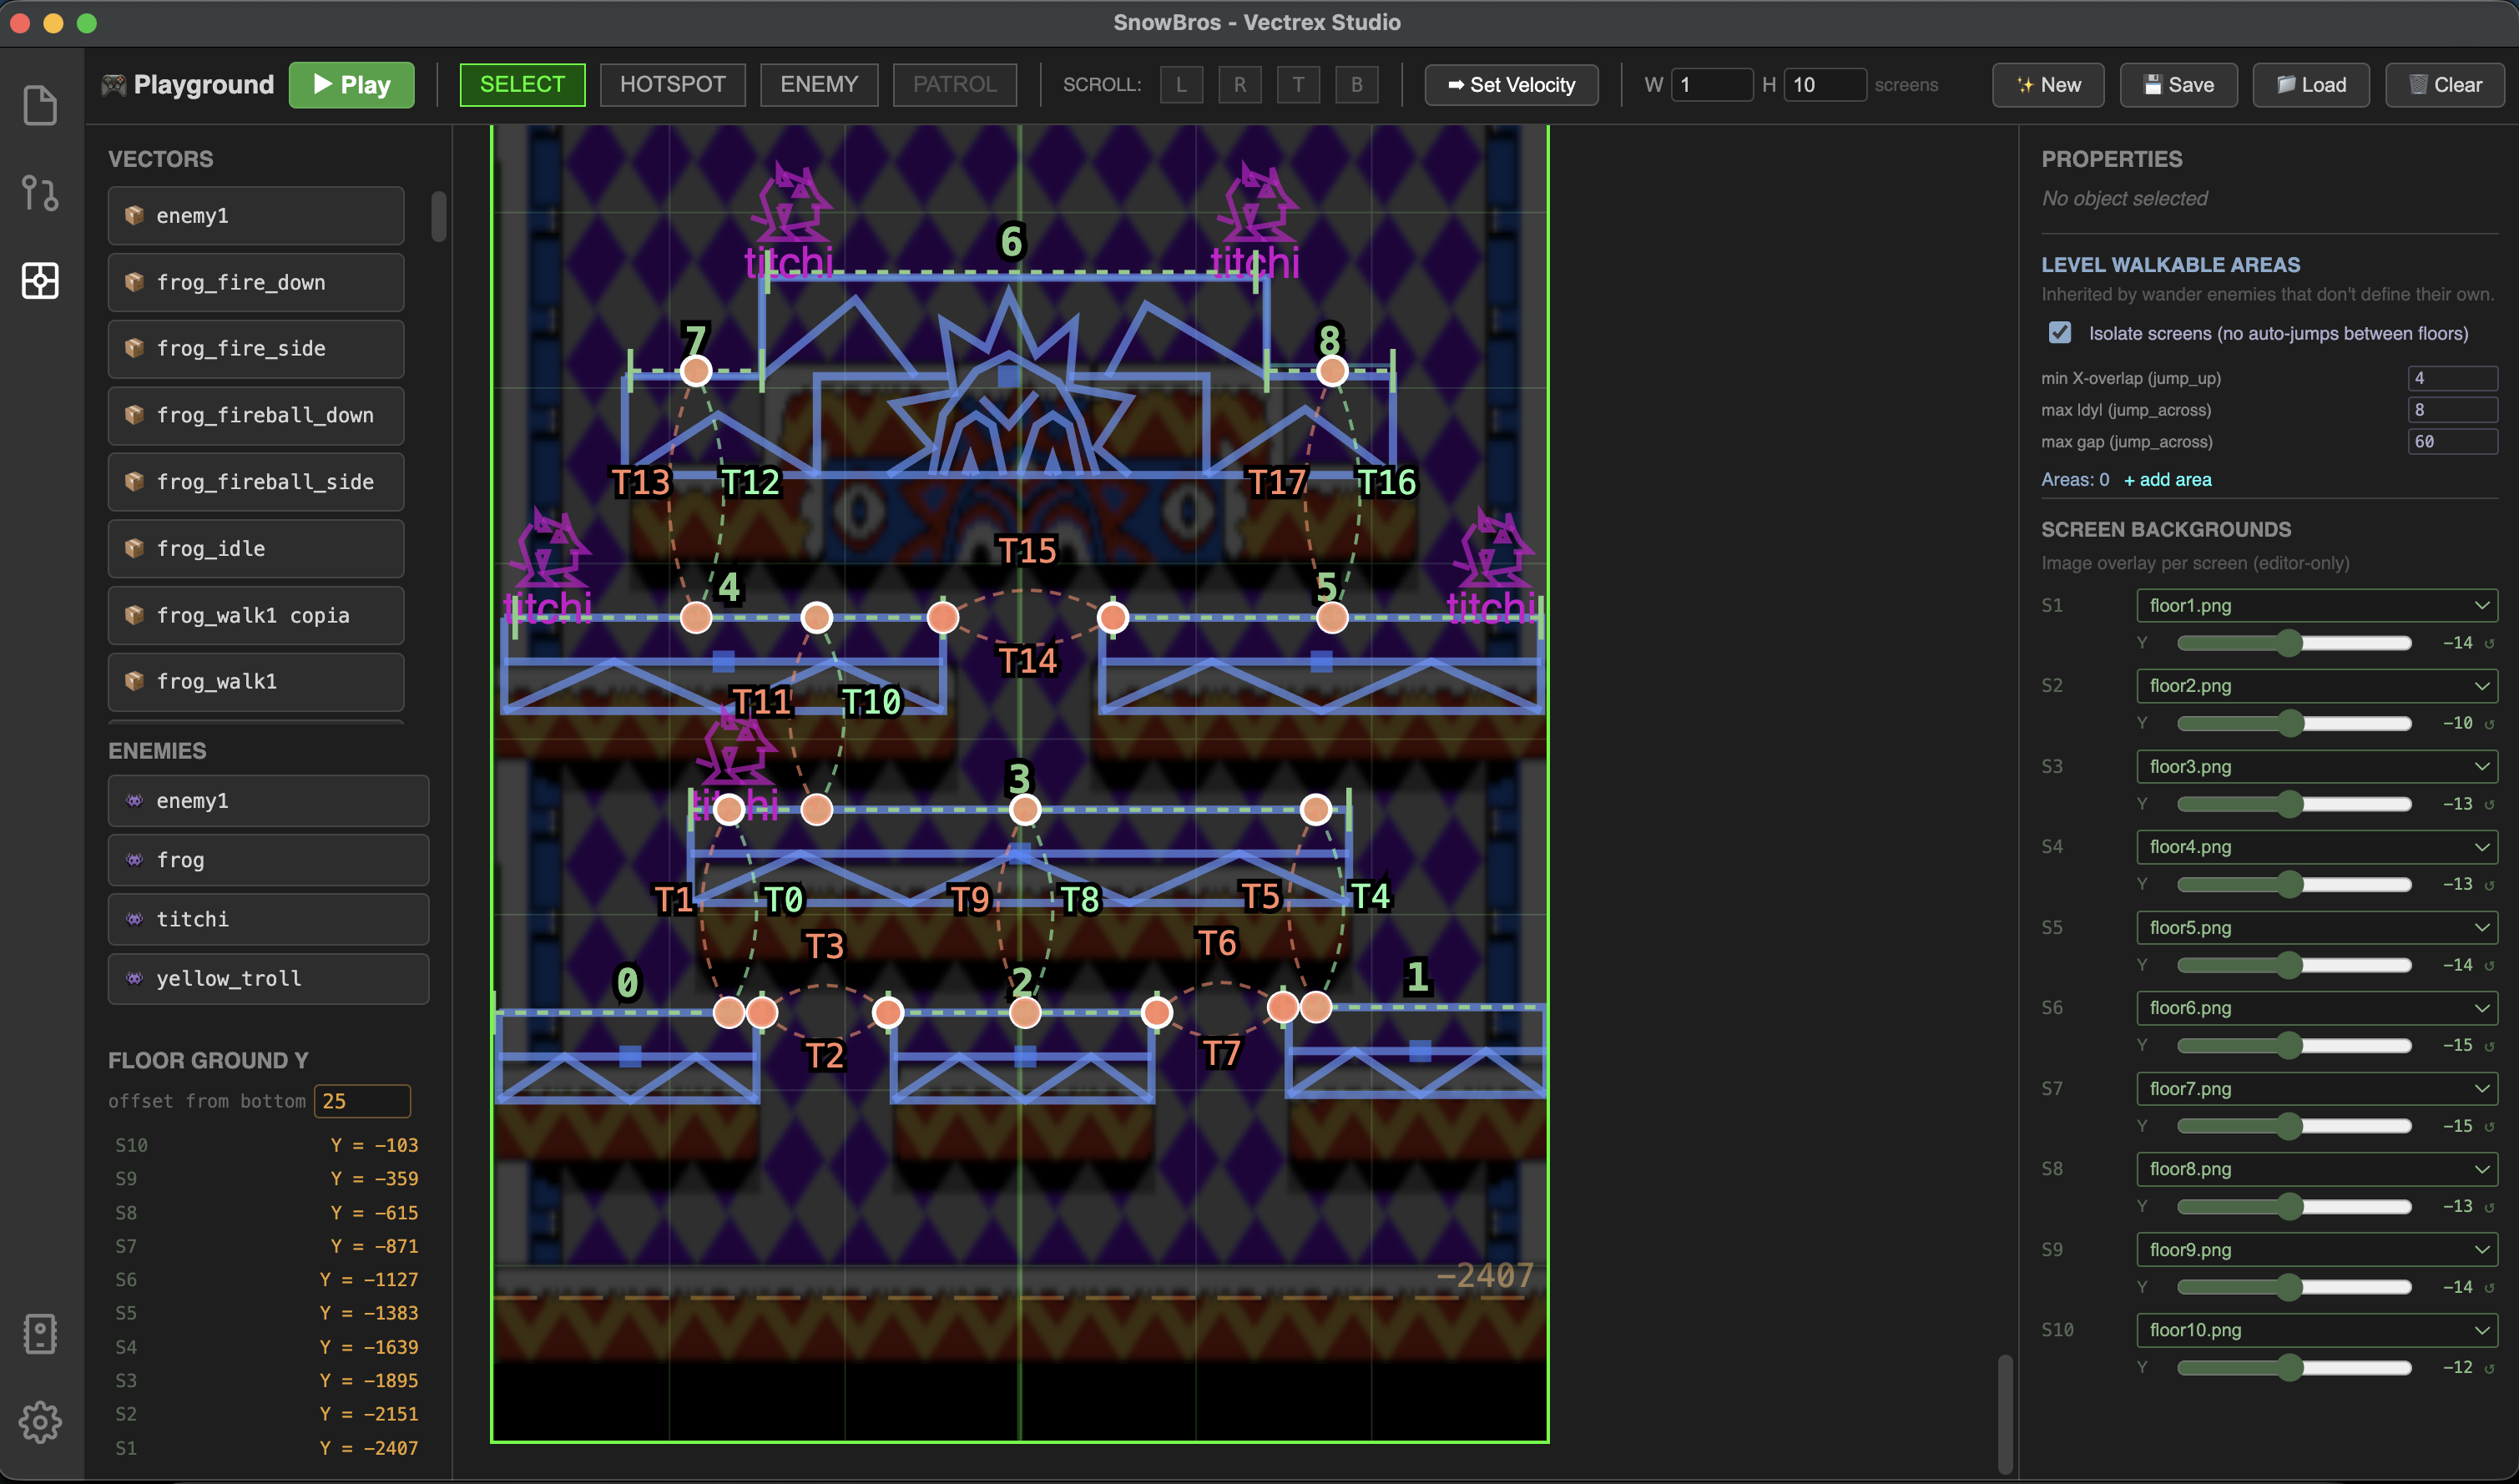
Canvas
The canvas shows the Vectrex world in Vectrex units (−128 to +127 on a single screen). Use scroll wheel to zoom and middle-mouse drag to pan.
Visual reference elements:
- Green grid — 32×32 unit tiles
- Dashed grey lines — screen boundaries (each screen is 192×256 units)
- Orange dashed line — ground floor Y per screen (driven by the Ground Bottom Offset setting)
- S1, S2… labels — screen index (S1 = bottom)
World size
Set how many screens the level spans using the W and H inputs in the toolbar (1–8 each). Each screen tile is 192 units wide and 256 units tall.
Asset palette (left panel)
Vectors
Lists every .vec file in the project. Drag one onto the canvas to place a background object.
Enemies
Lists every .venemy file. Click an enemy type to select it, then click on the canvas to place a spawn point. The selected enemy type is highlighted in magenta.
Ground Bottom Offset
Sets the Y distance (in units) from the bottom edge of each screen to the floor. Default is 42. This value is read by GET_LEVEL_FLOOR_Y() in VPy code.
Tools
| Tool | Use |
|---|---|
| Select | Click to select; drag to move; drag on empty canvas for rubber-band multi-select |
| Hotspot | Click canvas to place a trigger zone |
| Enemy | Click canvas to place the selected enemy type |
| Patrol | With an enemy selected, click canvas to add patrol waypoints |
Placing and editing objects
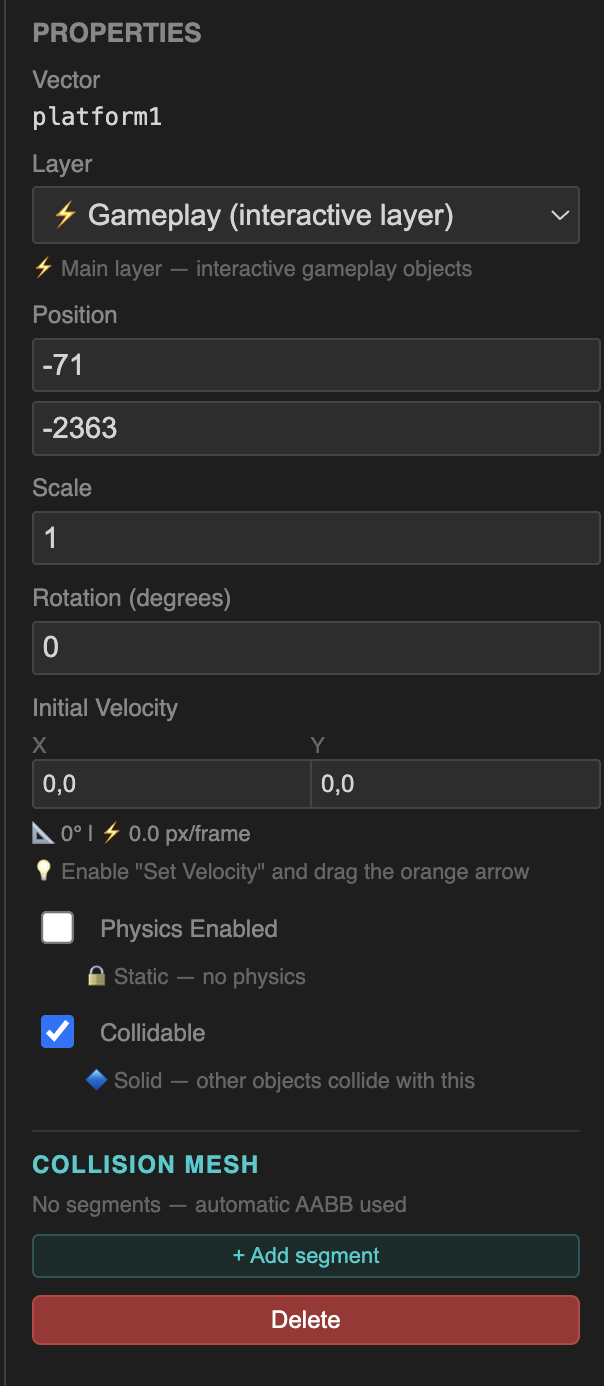
Drag a vector from the palette to place it. Click to select it — the right panel shows its properties:
| Property | Description |
|---|---|
| Layer | Background / Gameplay / Foreground — controls draw order |
| X, Y | World position; drag on canvas or type directly |
| Scale | Size multiplier (0.1–5.0) |
| Physics type | gravity, bounce, projectile, or static |
| Collidable | Marks the object as solid; exposes custom collision segments |
Select multiple objects by shift-clicking or rubber-band dragging, then move them as a group.
Enemies
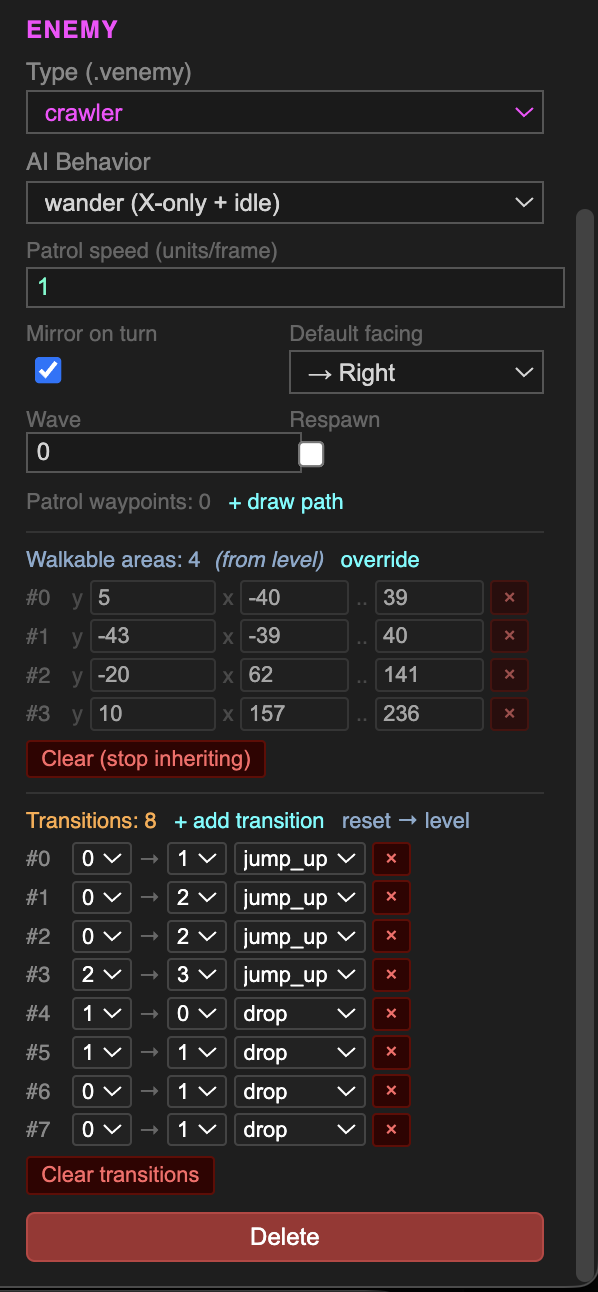
Click an enemy in the palette, switch to the Enemy tool, then click the canvas to place it. Select the placed enemy to configure it in the right panel:
| Property | Description |
|---|---|
| AI type | patrol / wander / chase / flee / static |
| Speed | Units per frame (0.1–20) |
| Mirror on turn | Flip sprite horizontally when reversing direction |
| Default facing | Which direction the enemy faces at spawn |
| Wave | Spawn wave group (0 = always present) |
| Respawn | Respawn after being defeated |
Patrol waypoints
With the enemy selected, switch to the Patrol tool and click the canvas to add waypoints. The enemy will walk between them in sequence. Drag individual waypoint markers to reposition them.
Wander — walkable areas
Wander enemies bounce between a walkable area's x_min and x_max boundaries at the area's Y level. By default they inherit the level-wide walkable areas (see below). Click Override in the right panel to define custom areas for just this enemy.
Each area has:
- Y — shelf height in world units
- x_min / x_max — left and right bounds
Level-wide walkable areas
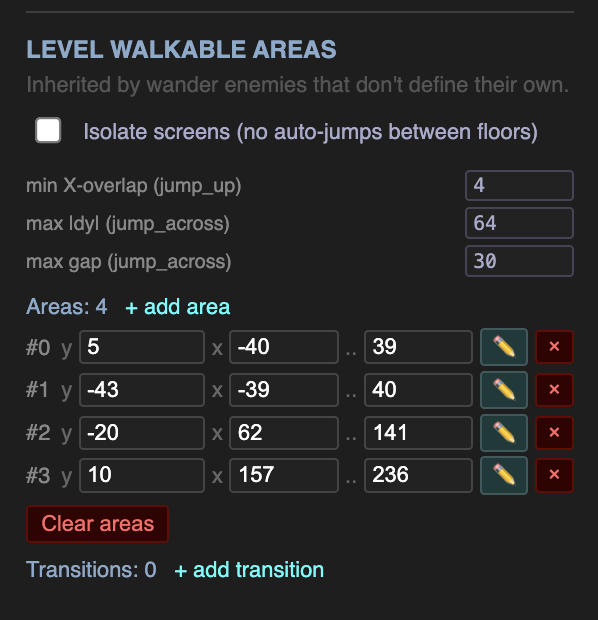
When no object is selected, the right panel shows level settings including Level Walkable Areas. These are inherited by all wander enemies that do not define their own areas.
Click + Add area to create a new area, then click and drag on the canvas to paint the shelf (Y from the click row, X range from the drag).
Auto-transitions
The compiler automatically derives jump and drop connections between areas based on proximity. You can tune three parameters:
| Parameter | Default | Description |
|---|---|---|
| Min X overlap | 4 | Minimum horizontal overlap (units) to generate a vertical jump/drop |
| Max ΔY | 8 | Maximum Y difference to consider areas on the same row (lateral jumps) |
| Max gap | 60 | Maximum horizontal gap (units) for a lateral jump_across connection |
Enable Isolate screens to prevent auto-transitions from crossing screen boundaries — useful for multi-floor games where each floor is an independent level.
Hotspots
Switch to the Hotspot tool and click the canvas to place a trigger zone. Select it to configure:
| Field | Description |
|---|---|
| Label | Text shown in-game when the player interacts |
| Trigger | player_near, player_on, projectile, or auto |
| W / H | Half-width and half-height of the trigger zone |
Hotspots appear as dashed orange rectangles on the canvas.
Scroll limits
Click the L, R, T, B buttons in the toolbar to add scroll limit markers. Drag the coloured lines on the canvas to set the exact boundary. The camera will not scroll past these limits.
Read them in VPy code with:
camera_x = clamp(target, GET_SCROLL_LIMIT_LEFT(), GET_SCROLL_LIMIT_RIGHT())
SET_CAMERA_X(camera_x)
Screen backgrounds
For multi-screen levels, the right panel (with nothing selected) shows a Screen Backgrounds section. Assign a PNG or JPG from your project's assets/ folder to each screen as a tracing or reference overlay. Images are shown at 25% opacity and are editor-only — they are not included in the compiled ROM.
Play simulation
Click ▶ Play to run a live physics and AI simulation directly in the editor. Enemies patrol and wander, physics objects fall and bounce. Click ⏹ Stop to restore the level to its saved state.
This is useful for checking platform positions, patrol routes, and walkable area coverage before building.
Save and load
| Action | Behaviour |
|---|---|
| ✨ New | Clears the canvas and resets all settings. Asks for confirmation if there is unsaved content. |
| 💾 Save | Quick-saves if the level has a name; otherwise opens a dialog to enter one. Saved as assets/playground/{name}.vplay. Also triggered with Ctrl+S / Cmd+S. |
| 📁 Load | Opens the scene list. Click a scene to load it; levels are auto-migrated from v1.0 format if needed. |
| 🗑️ Clear | Removes all objects and hotspots but keeps level metadata. |
Using the level in VPy
def main():
    LOAD_LEVEL("world_1")      # load geometry and enemies
    SPAWN_ENEMIES("world_1")   # initialise enemy pool (call once)

def loop():
    UPDATE_ENEMIES()           # advance AI each frame
    SHOW_LEVEL()               # draw all objects in the level
    DRAW_ENEMIES()             # draw all enemies (applies camera offset)