Vectrex Studio can write your compiled .bin ROM directly to an EPROM chip without leaving the IDE. It uses the open-source minipro command-line tool under the hood, with a GUI wrapper that handles chip selection, programmer detection, and progress streaming.
Open the EPROM Programmer from the activity bar (chip icon) or from Tools → EPROM Programmer.
Requirements
minipro
minipro is a free CLI tool for TL866-series programmers. The IDE can install it automatically:
- macOS: click Install minipro in the dialog — runs
brew install miniprointernally. - Linux: click Install minipro — runs
sudo apt-get install -y minipro. - Manual: follow the minipro installation guide.
When the dialog opens it checks whether minipro is on your PATH and shows a green indicator if found.

Hardware
Connect your programmer via USB before opening the dialog. Supported programmers:
| Model | Notes |
|---|---|
| TL866II Plus | Recommended — most common, widely available |
| TL866A | Older hardware revision |
| TL866CS | Older hardware revision |
| T48 | Newer model, broader chip support |
| T56 | High-end model |
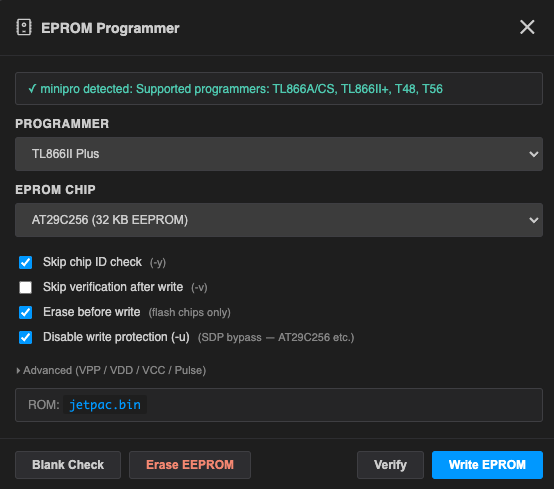
Chip Selection
Choose the target chip from the Chip dropdown. Common chips for Vectrex cartridges:
| Chip | Capacity | Notes |
|---|---|---|
| 27C256 | 32 KB | Standard single-bank Vectrex cartridge |
| 27C512 | 64 KB | Multibank — requires bank-switching cartridge PCB |
| 27C128 | 16 KB | Small demos and tests |
| 27C010 | 128 KB | Larger multibank projects |
| 27C020 | 256 KB | — |
| 27C040 | 512 KB | Maximum supported by TL866II+ |
The IDE remembers your chip and programmer selection across sessions.
Operations
Write
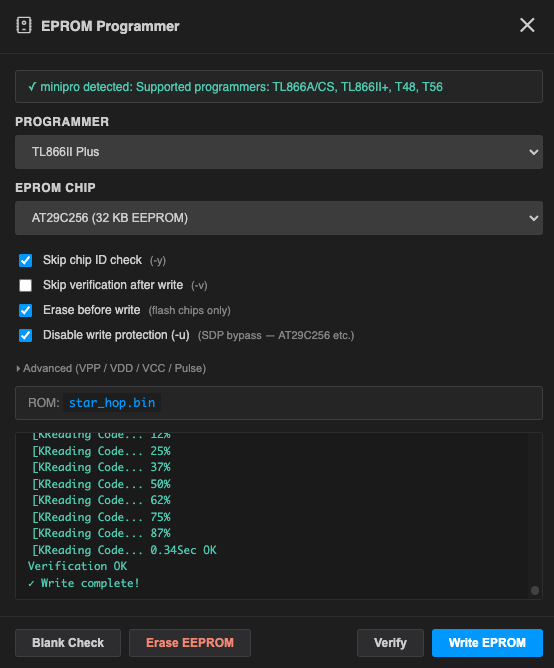
Writes the current project's compiled .bin file to the chip. The IDE automatically uses the output path from your .vpyproj.
- Build your project first (Ctrl+F7) to make sure the
.binis up to date. - Insert the chip into the programmer socket in the correct orientation.
- Select the chip and programmer, then click Write.
The log panel streams minipro output in real time. A green checkmark confirms success.
Verify
Reads back the chip and compares it byte-for-byte against the .bin file. Run this after every write to confirm the chip programmed correctly.
Erase
Erases the chip to an all-0xFF blank state. Required before re-writing a chip that already contains data. Some chips support Erase First (see Advanced Options) which erases automatically as part of the Write operation.
Blank Check
Reads the chip and verifies it is blank (all bytes 0xFF) before writing. Useful to confirm an erase succeeded.
Advanced Options
Click Advanced to expand voltage and timing overrides. These are saved per chip.
| Option | Description |
|---|---|
| Skip ID check | Skip the chip ID verification step. Useful if minipro does not recognise a compatible clone chip. |
| Skip verify | Do not verify after writing. Faster but less safe. |
| Erase first | Automatically erase before writing. Equivalent to running Erase then Write. |
| Unprotect | Remove write protection before erasing (required for some SST and ATMEL flash chips). |
| Vpp / Vdd / Vcc | Override programming voltages. Leave at defaults unless you have a specific chip datasheet requirement. |
| Pulse | Override the programming pulse width in microseconds. |
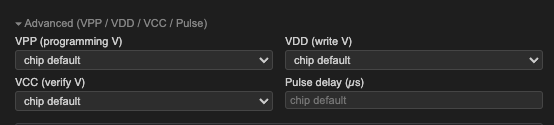
⚠️ Incorrect voltage overrides can permanently damage the chip or the programmer. Only change these if you know what you are doing and have the chip datasheet in front of you.
Typical Workflow
- Write your game in VPy and build: Ctrl+F7.
- Open the EPROM Programmer from the activity bar.
- Select chip (e.g. 27C256) and programmer (TL866II Plus).
- Click Erase, wait for completion.
- Click Write — the IDE writes
build/yourgame.binto the chip. - Click Verify to confirm the write.
- Insert the chip into your Vectrex cartridge PCB and test on hardware.