This tutorial builds Star Hop — a side-scrolling platformer — completely from scratch. By the end you will have a working game that runs in the IDE emulator and on real Vectrex hardware. Along the way you will touch every major tool in Vectrex Studio: VectorEditor, AnimationEditor, the Playground level editor, the enemy system, the Music and SFX editors, and of course the VPy compiler.
What you will build:
- A player character that moves and jumps across a 3-screen wide level
- A horizontal scrolling camera that follows the player
- 3 platforms at different heights
- 6 collectible stars spread across the level
- 1 patrol enemy that walks back and forth
- Background music and jump / collect sound effects
- A title screen and a game-over screen
- A live score display
Time: approximately 2 hours end-to-end.
Prerequisites: Vectrex Studio installed and open. No prior VPy or assembly experience required.
1. Create the project
Open Vectrex Studio. Go to File → New Project, name it star_hop, and choose a folder. The IDE creates this structure:
star_hop/
├── star_hop.vpyproj
└── src/
    └── main.vpy
Open star_hop.vpyproj and confirm it looks like this:
[project]
name    = "star_hop"
version = "0.1.0"
entry   = "src/main.vpy"

[build]
output        = "build/star_hop.bin"
target        = "vectrex"
optimization  = 2
debug_symbols = true

[sources]
vpy = ["src/**/*.vpy"]

[resources]
vectors    = ["assets/vectors/*.vec"]
animations = ["assets/animations/*.vanim"]
enemies    = ["assets/enemies/*.venemy"]
music      = ["assets/music/*.vmus"]
sfx        = ["assets/sfx/*.vsfx"]
playground = ["assets/playground/*.vplay"]
2. Draw the assets
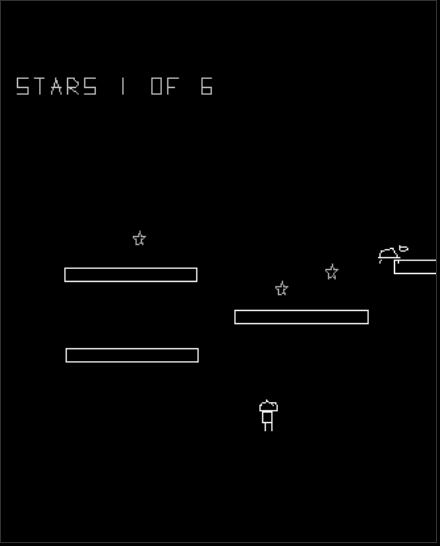
Player
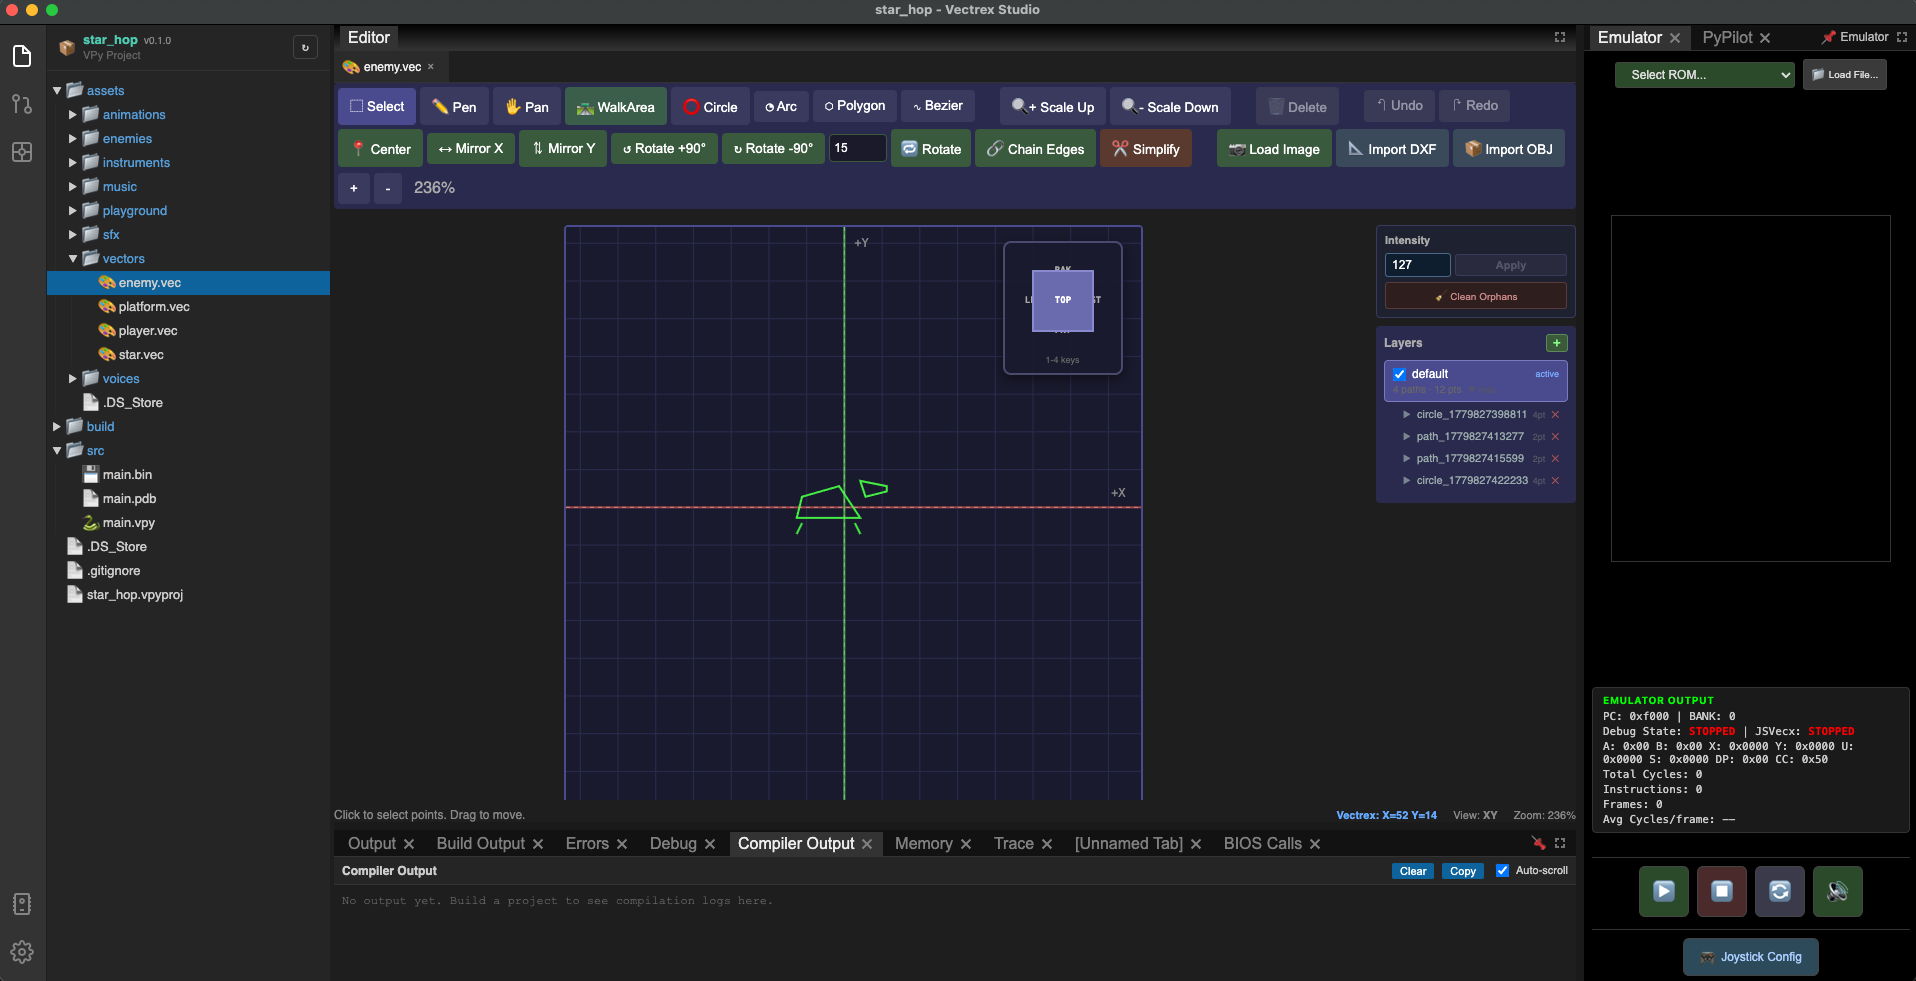
Go to File → New → Vector List (.vec). Name the file player — the IDE saves it as assets/vectors/player.vec and opens it in the VectorEditor.
Draw a simple humanoid shape: a circle for the head, a rectangle for the body, two lines for legs. The whole figure should fit inside about 20×30 units. Set the origin at the feet so the Y coordinate represents ground contact.
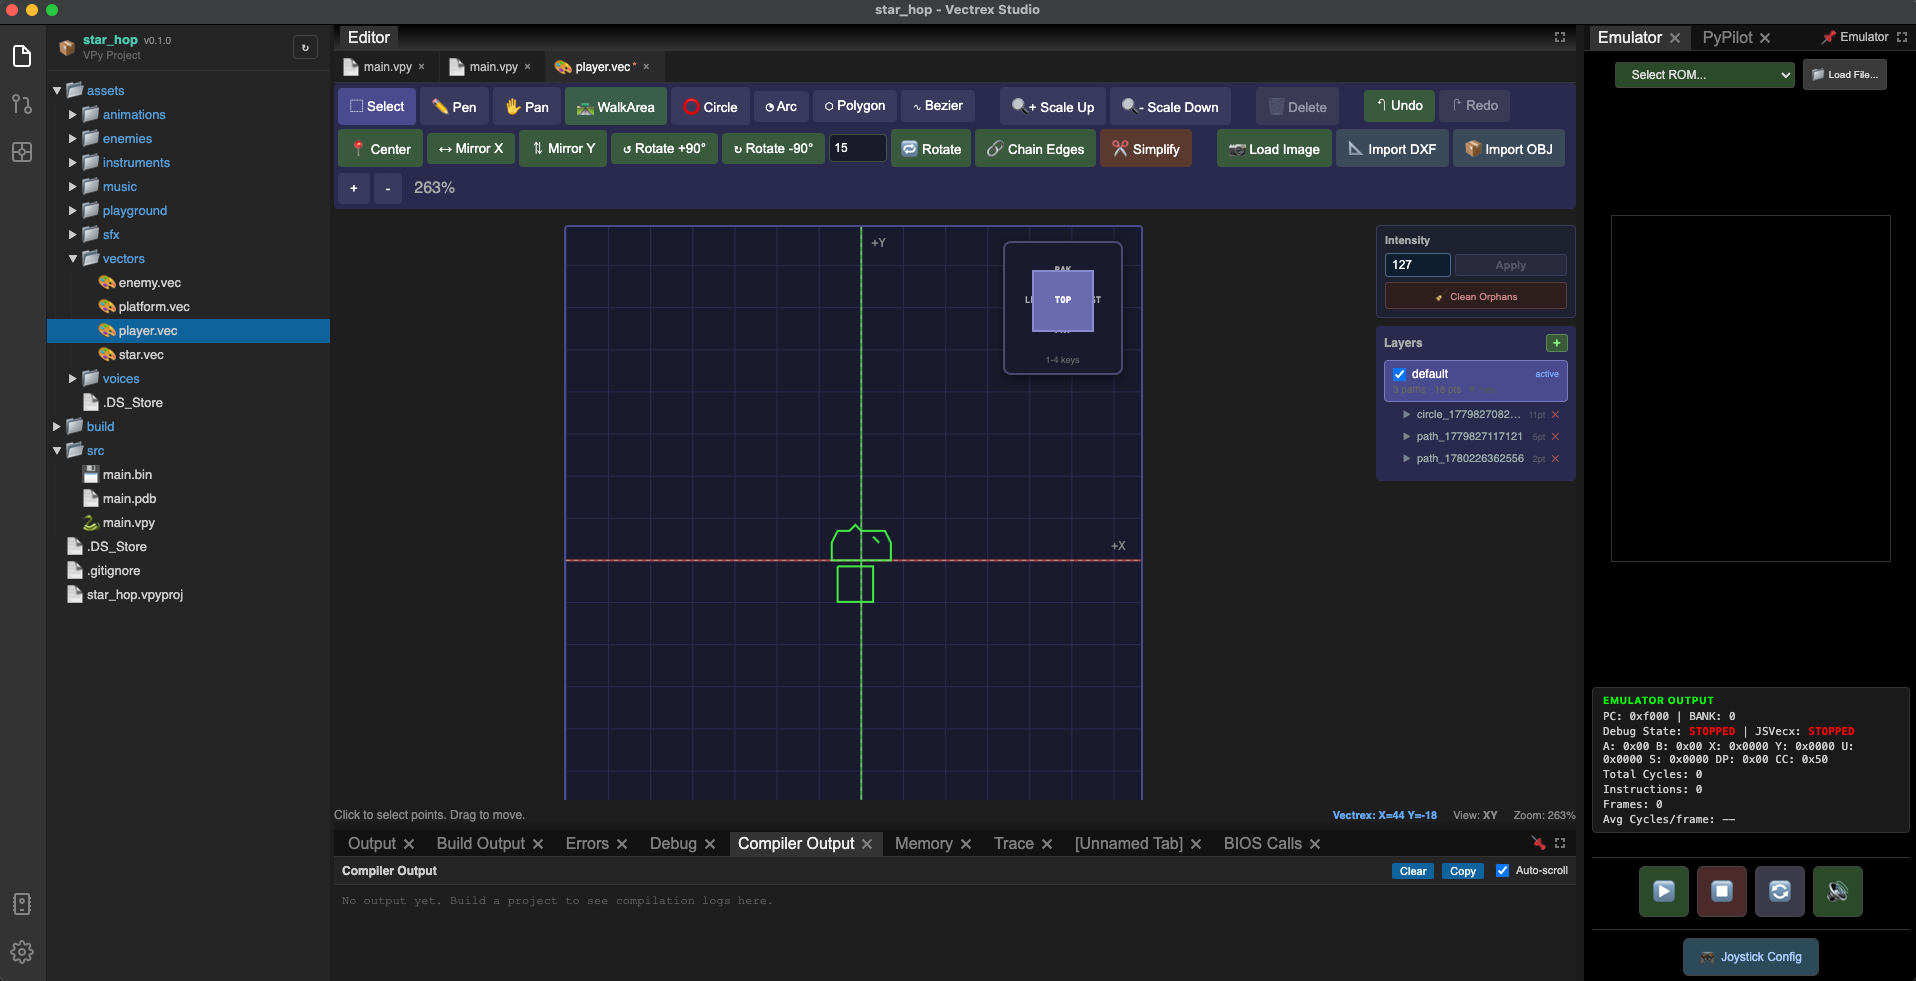
Platform
File → New → Vector List (.vec), name it platform. Draw a flat horizontal rectangle, roughly 80 units wide and 6 units tall. This will be reused for every platform in the level.
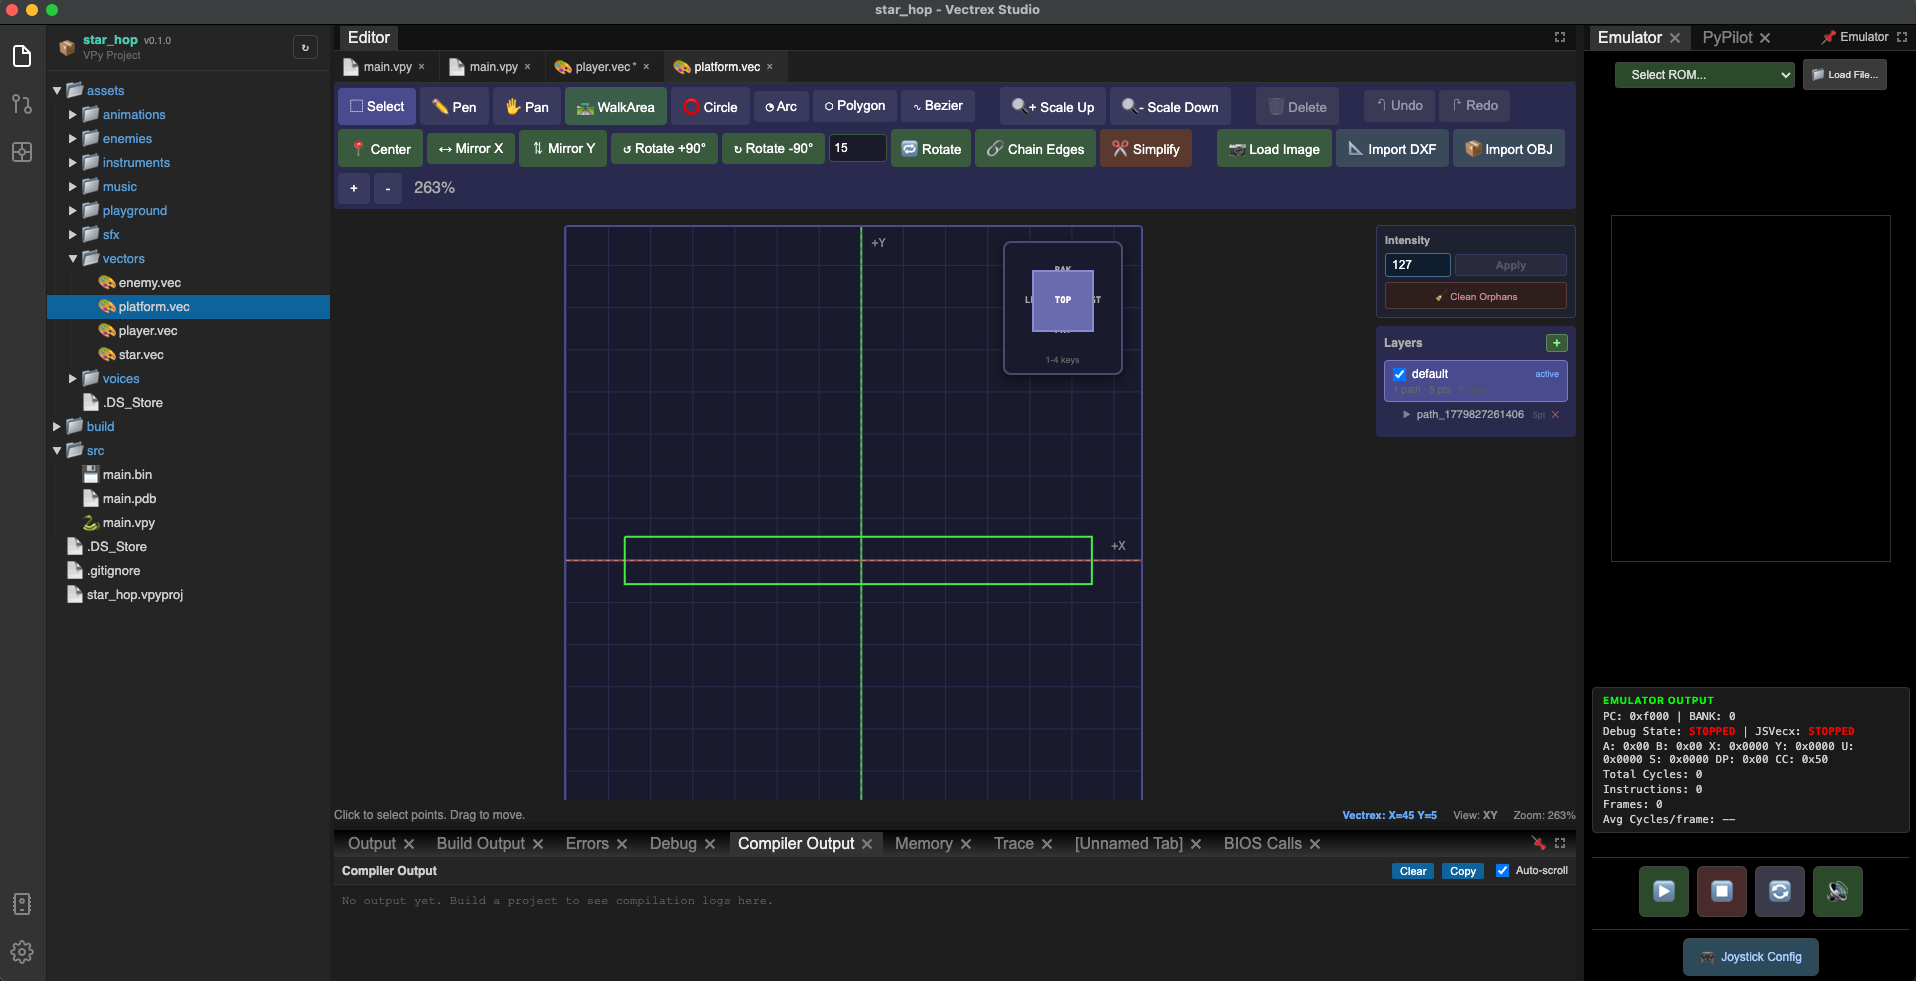
Star
File → New → Vector List (.vec), name it star. A small 5-pointed star or a simple diamond (two crossed lines) works well. Keep it under 10×10 units.
Enemy
File → New → Vector List (.vec), name it enemy. A simple creature shape — a rounded body and two stubby legs. Make it visually distinct from the player. About 18×20 units, origin at the feet.
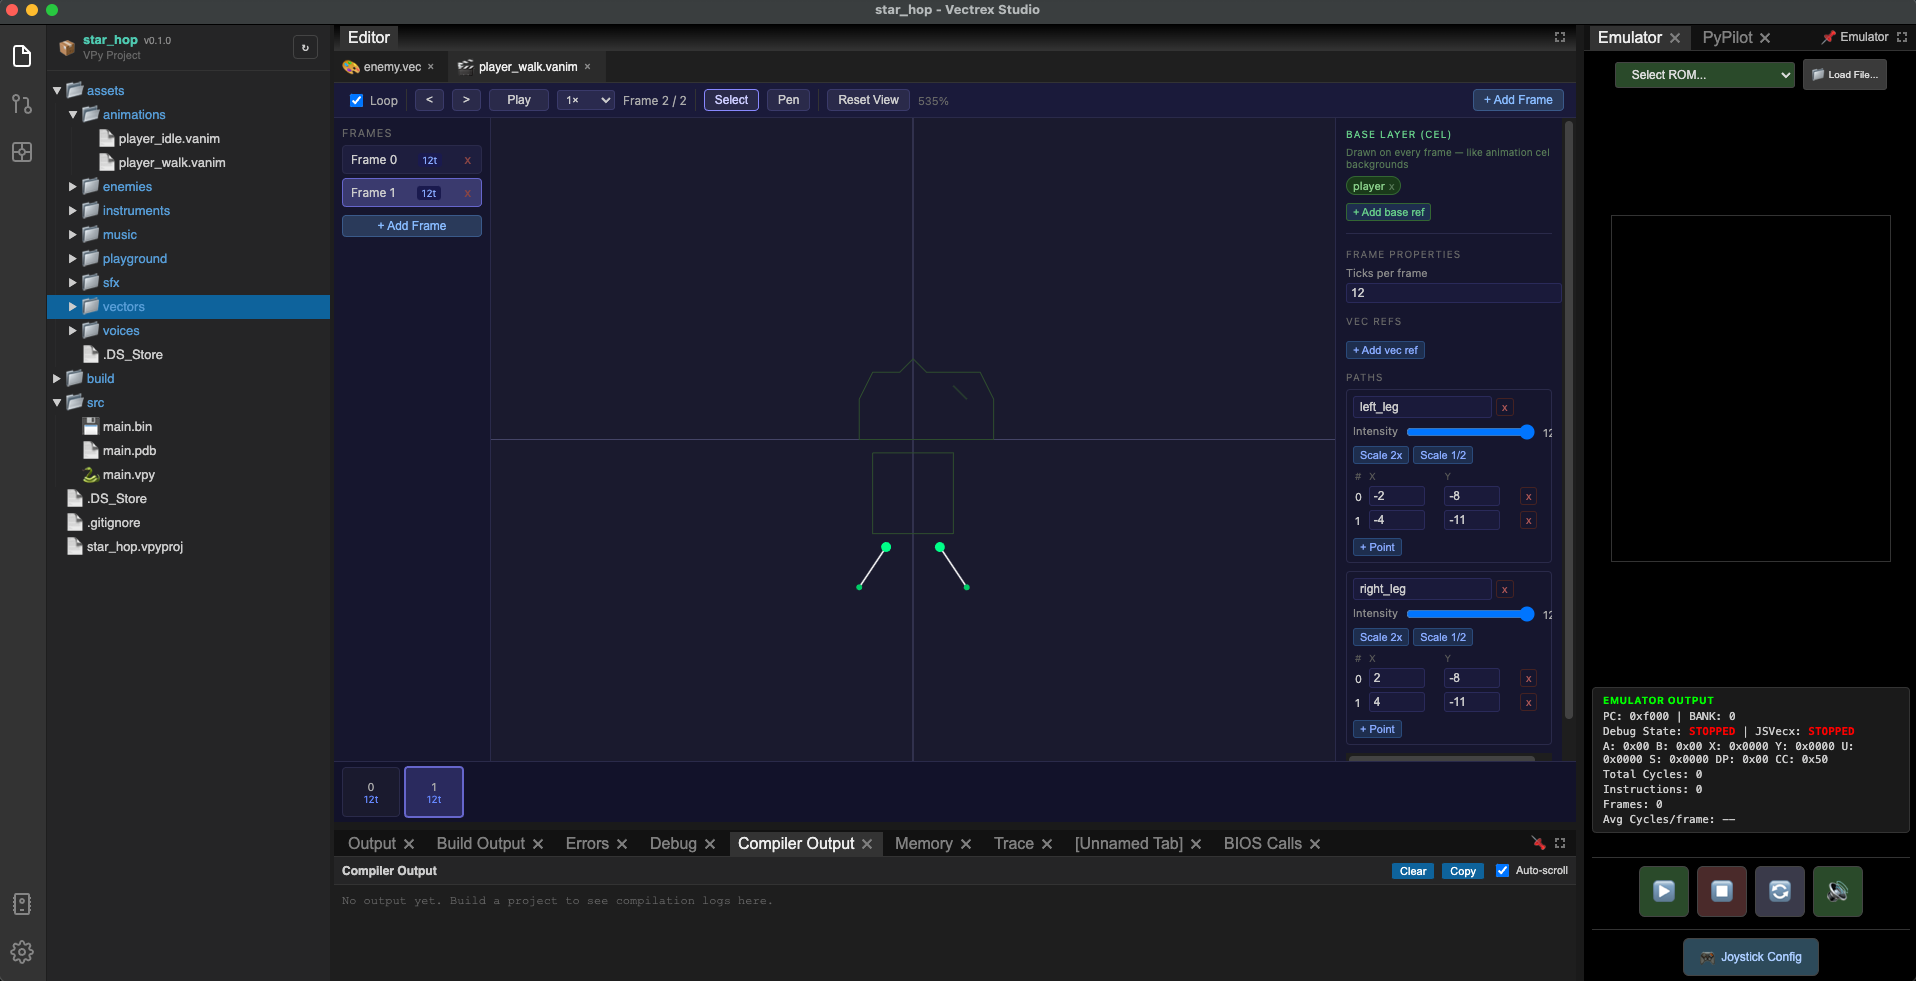
3. Create the walk animation
Go to File → New → Animation (.vanim). Name the file player_walk — saved as assets/animations/player_walk.vanim. The body stays the same every frame so it goes in base_refs; the legs change per frame and are drawn inline using paths. Open the AnimationEditor, click the path tool on the canvas, and draw the legs directly for each frame:
{
  "version": "1.0",
  "name": "player_walk",
  "loop": true,
  "base_refs": ["player"],
  "frames": [
    {
      "index": 0,
      "duration_ticks": 12,
      "vec_refs": [],
      "paths": [
        { "intensity": 127, "points": [{"x": -2, "y": 4}, {"x": -2, "y": 1}] },
        { "intensity": 127, "points": [{"x":  2, "y": 4}, {"x":  2, "y": 1}] }
      ]
    },
    {
      "index": 1,
      "duration_ticks": 12,
      "vec_refs": [],
      "paths": [
        { "intensity": 127, "points": [{"x": -2, "y": 4}, {"x": -4, "y": 1}] },
        { "intensity": 127, "points": [{"x":  2, "y": 4}, {"x":  4, "y": 1}] }
      ]
    }
  ]
}
Key fields:
base_refsis a string array of.vecasset names drawn before every frame.vec_refsis a string array of.vecnames drawn on this frame.pathsare inline vector segments embedded directly in the frame — convenient for small per-frame edits (legs, blinks, sparkles) without creating a.vecfile for each pose. The compiler converts inline paths into synthetic vec assets at build time so they render identically on M6809, ARM, and PiTrex.duration_ticksis per frame, in 50 Hz screen ticks (12 ticks ≈ 0.24 s per frame).
If you prefer the cleaner "separate-vec" approach, create player_legs_a.vec and player_legs_b.vec, leave paths: [], and set vec_refs: ["player_legs_a"] / ["player_legs_b"]. Both approaches produce the same output.
4. Define the enemy type
Go to File → New → Enemy (.venemy). Name the file crawler. The IDE opens the Enemy Editor — a panel divided into several sections.
Actions
Actions are the named behaviours the enemy can perform. A new enemy starts with idle and walk already created.
- In the
walkrow, open the sprite dropdown. It lists every.vecand.vanimfile in your project — select enemy.vec. - Check the Loop checkbox so the animation cycles continuously while the enemy is in this action.
Leave idle as-is.
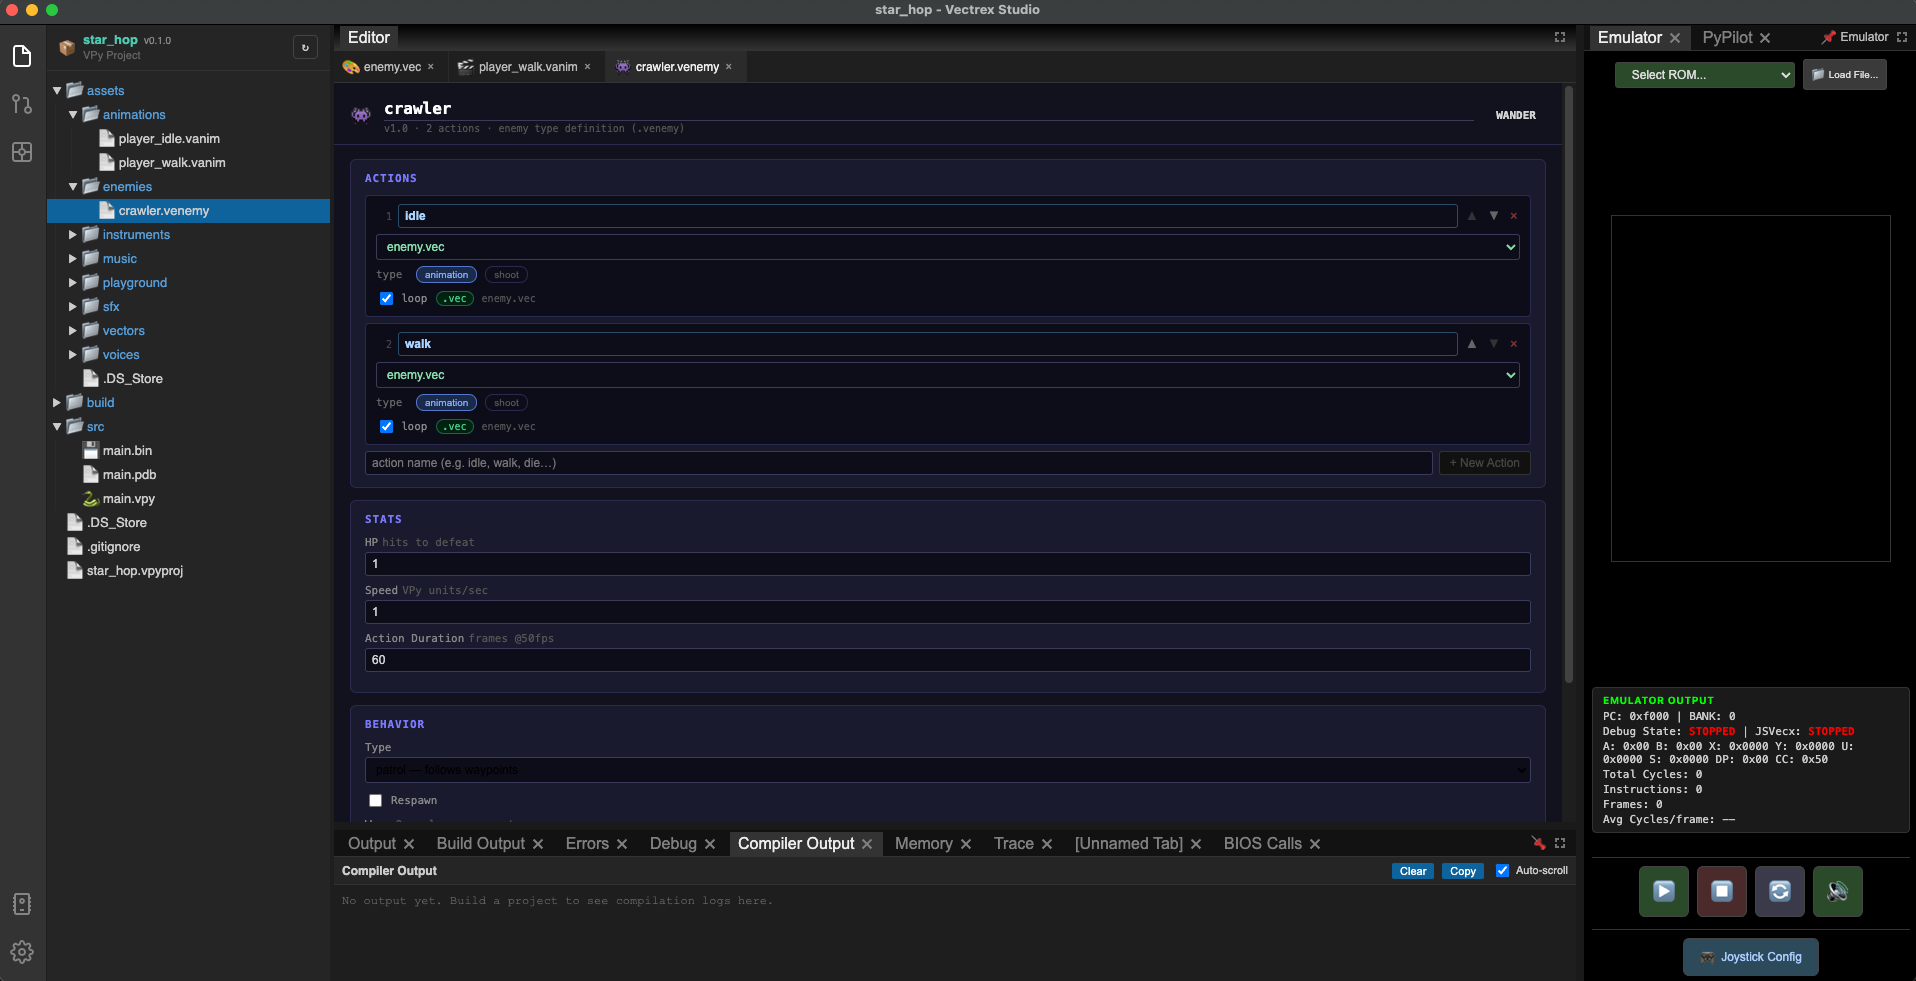
Stats
In the Stats section set:
| Field | Value |
|---|---|
| Speed | 1 |
| HP | 1 |
| Action Duration | 60 |
Speed 1 is slow enough to be dodgeable. HP 1 keeps the tutorial simple.
Behavior
Open the Behavior section:
- Set the Type dropdown to wander.
- Check Mirror on turn — the sprite flips horizontally when it changes direction.
- Set Patrol action to walk — this tells the AI which action to play while moving.
- Leave Default facing at its default (right).
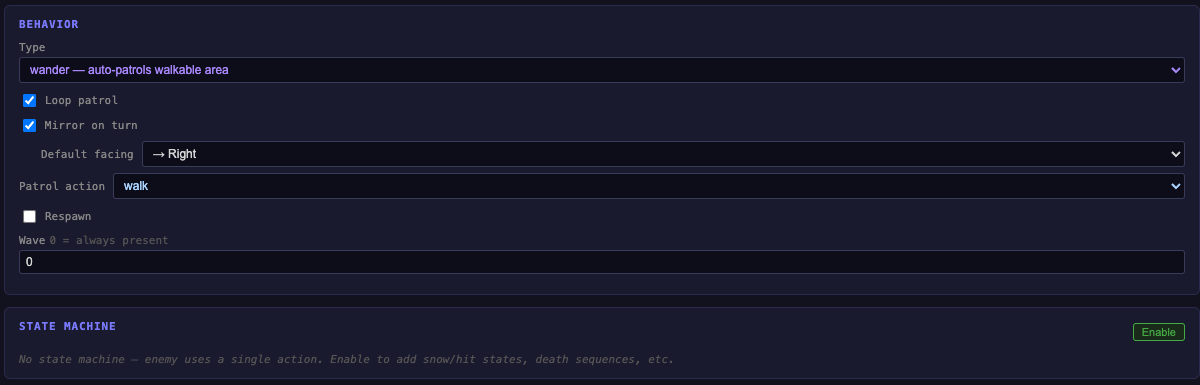
Patrol Waypoints
Leave the Patrol Waypoints list empty. When a wander enemy has no explicit waypoints, the compiler automatically derives a two-point patrol route from the walkable area painted on its platform in the Playground — the enemy walks from the left edge to the right edge of that surface and back. You only need to paint the walkable area correctly; no waypoints to place manually.
State Machine
Leave the State Machine disabled. A single-action patrol enemy does not need states. You can enable it later when you want hit reactions or attack patterns.
The compiler reads this .venemy file at build time and emits ROM tables automatically — you never touch the generated assembly.

5. Design the level
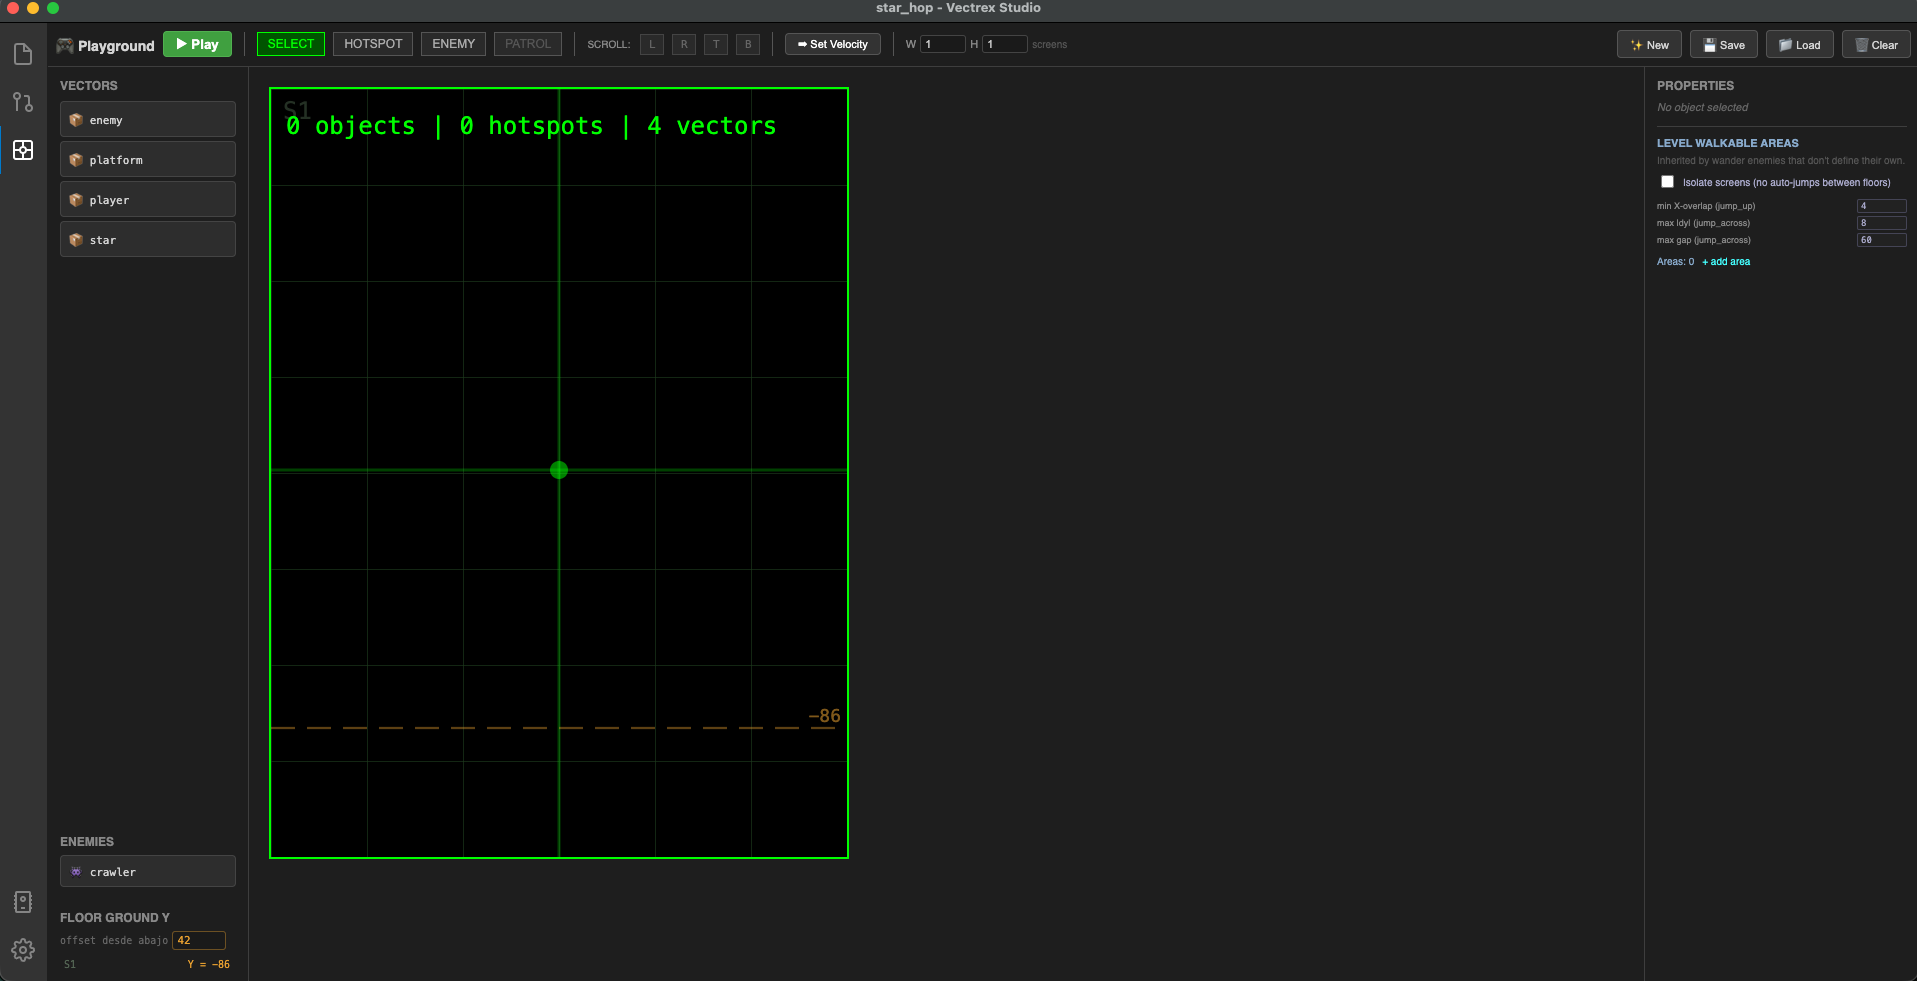
Click the Playground icon in the activity bar to open the level designer. The Playground opens full-screen, hiding the compiler and emulator panels so you have maximum canvas space. A new level is created automatically. When you save it (Ctrl+S / Cmd+S) the IDE will ask for a name — enter world_1. It saves as assets/playground/world_1.vplay.
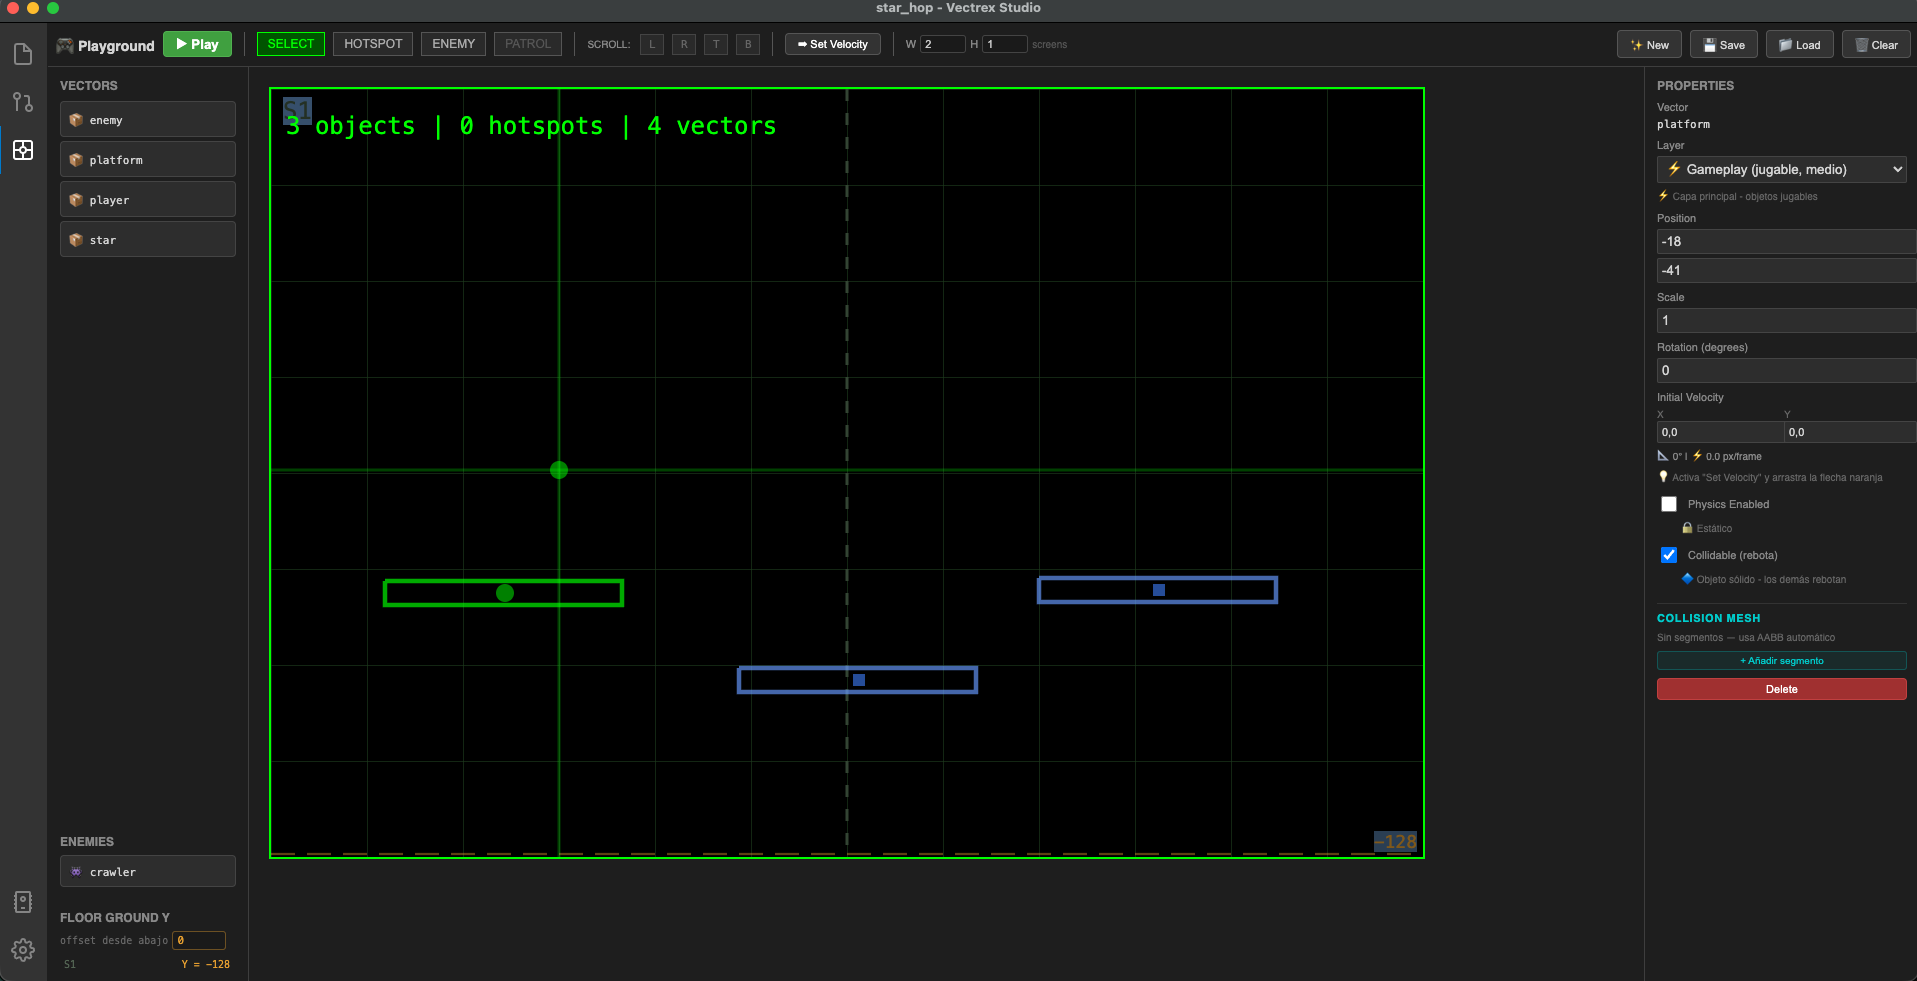
Set the world bounds to fit 2 screens: in the Playground settings set Width to 2 screens and Height to 1 screen.
Place the platforms
In the gameplay layer, drag the platform asset and place it three times:
| Platform | X | Y | Purpose |
|---|---|---|---|
| Mid left | -18 | -41 | Elevated platform, left side |
| Mid right | 100 | -70 | Elevated platform, right side |
| High | 200 | -40 | Highest platform, far right |
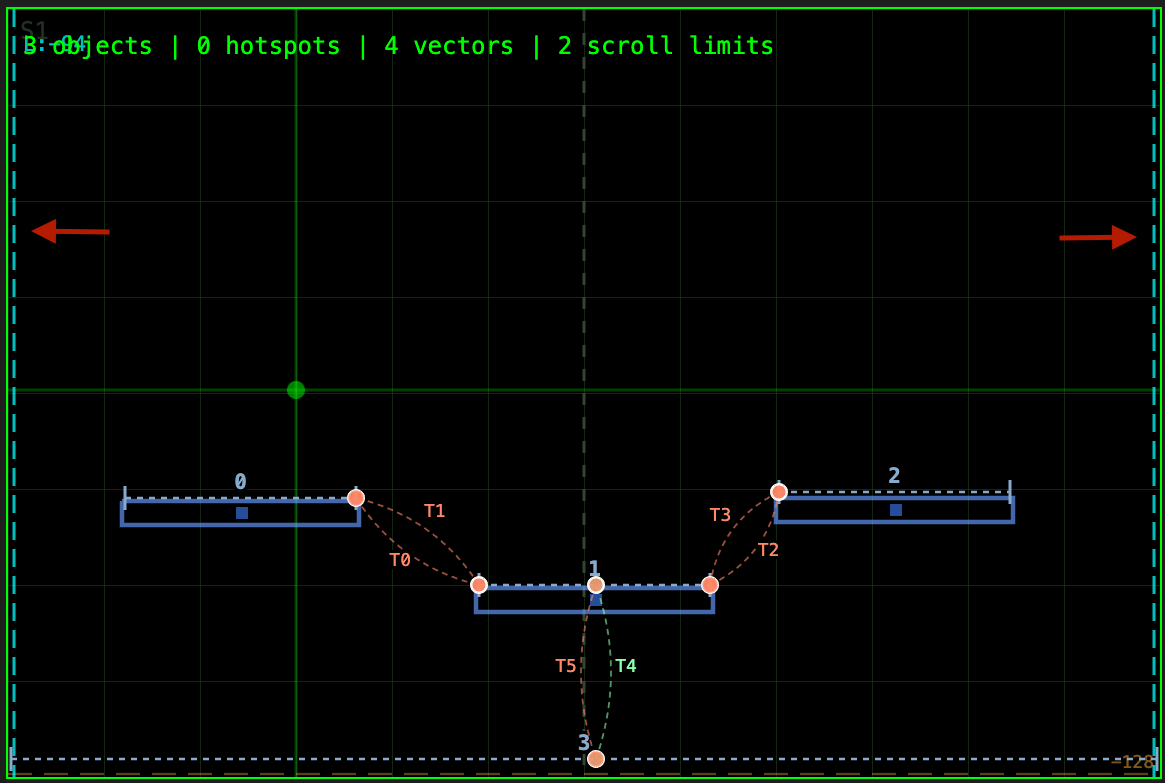
Add walkable areas to platforms
Click on an empty area of the canvas to deselect any object. The right-hand panel will show the level properties. Click + Add area to create a new walkable area, then click the pencil icon and drag on the platform to define the shelf where the enemy can walk.
For the ground, draw a walkable area that spans the full width. For the raised platforms, draw an area matching the top surface of each one.

Set scroll limits
Drag the scroll limit markers at the screen edges:
- Left limit:
-96 - Right limit:
287 - Top and bottom: leave at defaults
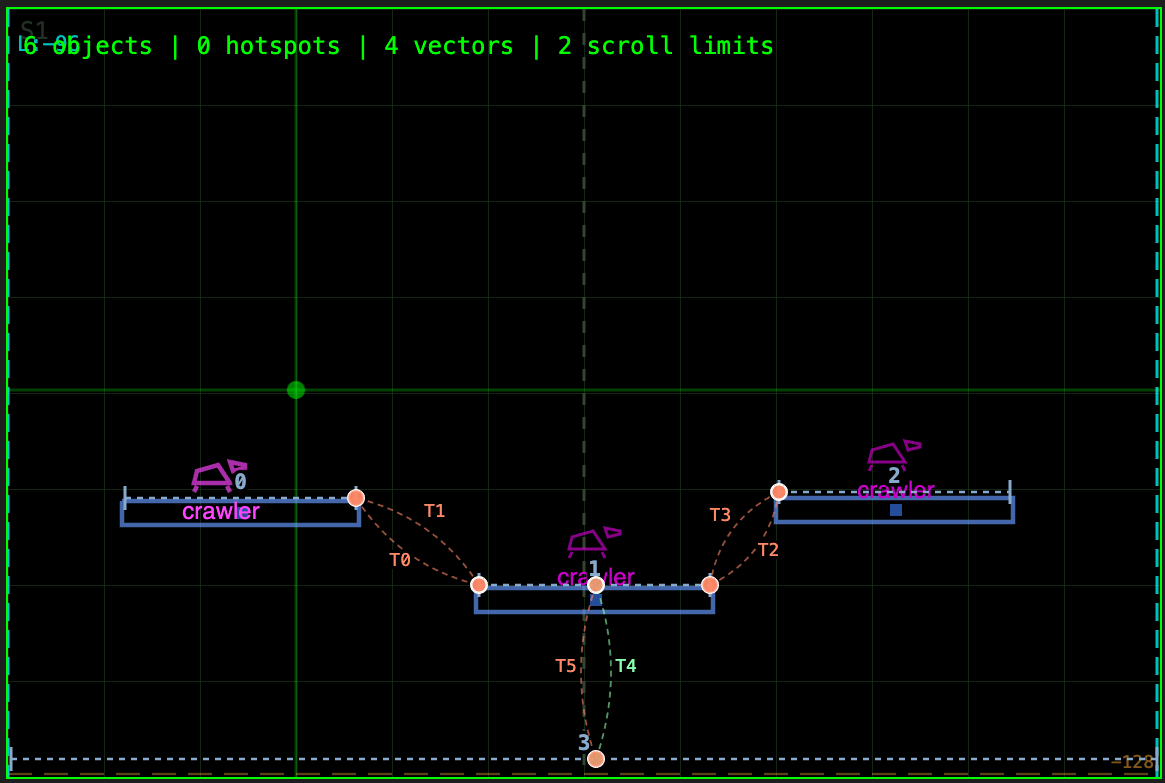
Place the enemy spawn point
In the asset palette on the bottom-left, click crawler to select it. Then click on the canvas at the mid-left platform position to place the spawn point there.
A note on collectibles
Do not place the star asset in the Playground. Stars are game-state objects — they need to disappear when collected, which SHOW_LEVEL cannot handle (it always draws everything in the level). Star positions are defined directly in the VPy code arrays and drawn by draw_stars(), which checks the star_taken flag before drawing each one. The Playground is for level geometry (platforms, terrain) and enemy spawn points only.
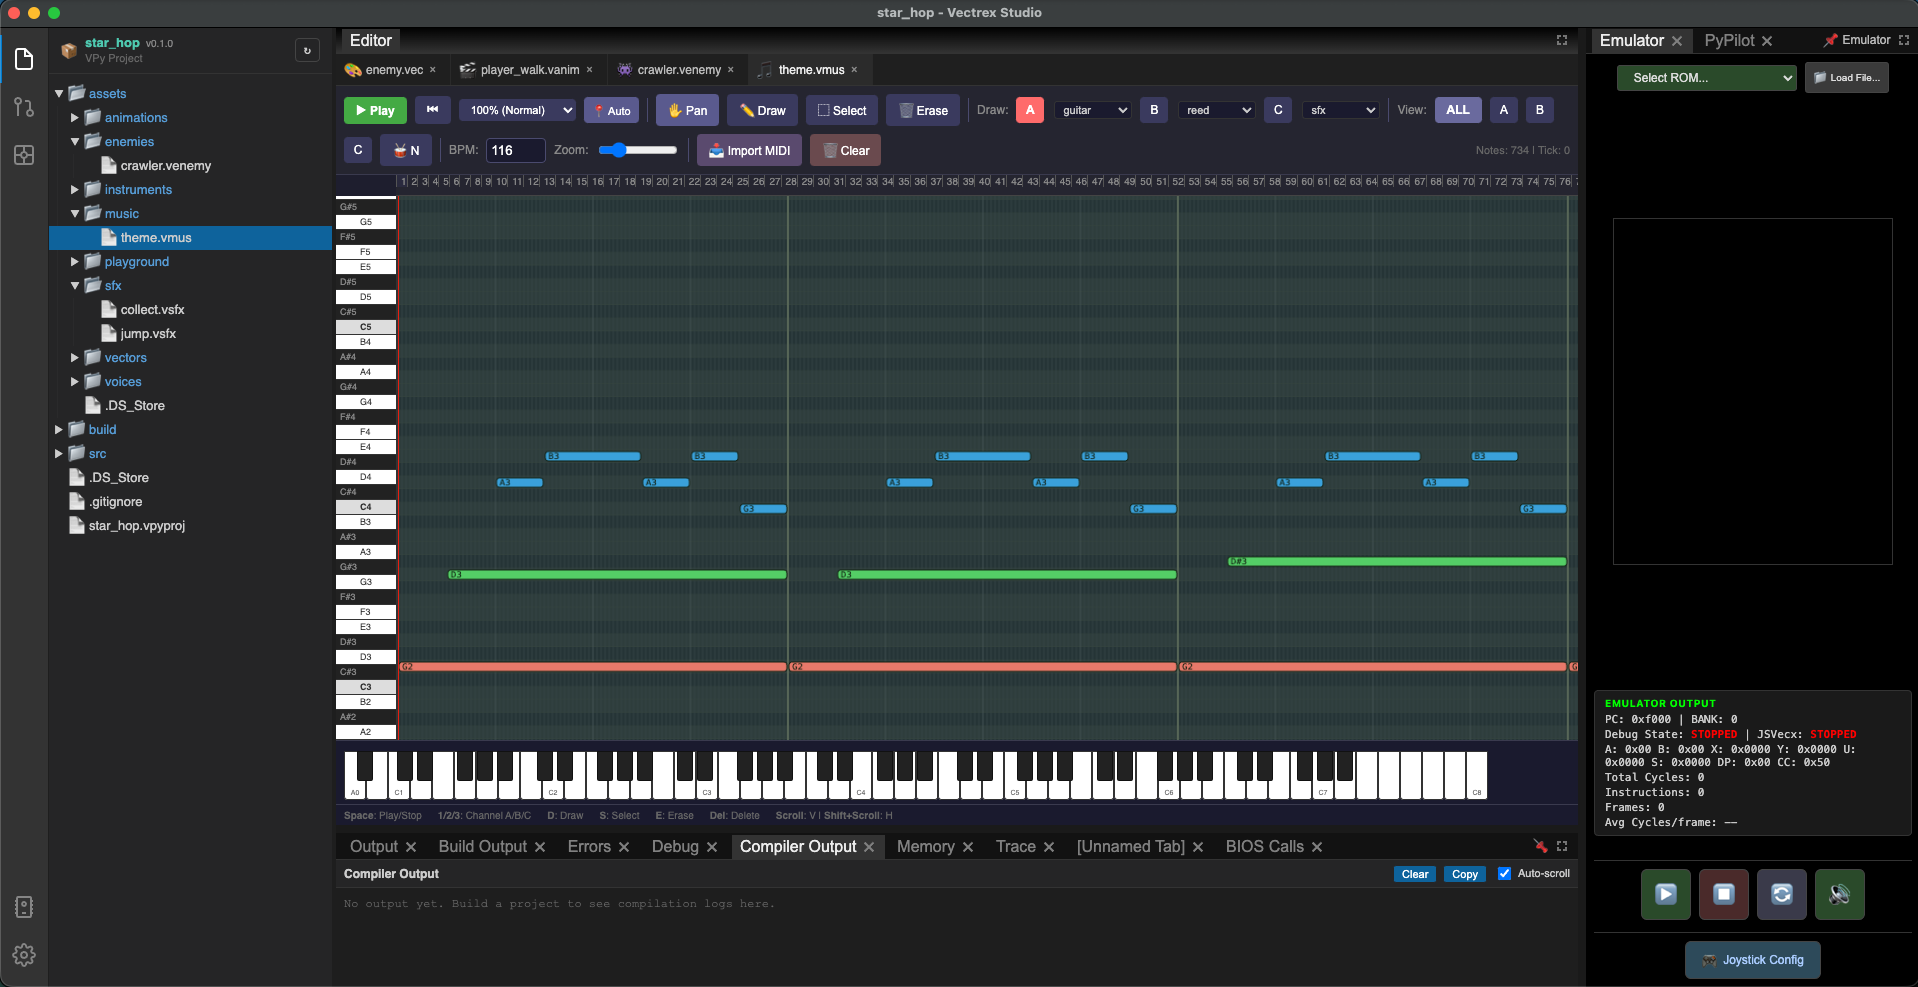
6. Compose the music
Go to File → New → Music (.vmus). Name the file theme — saved as assets/music/theme.vmus.
Compose a short looping theme — 8 to 16 bars. A simple melody on channel A with a bass line on channel B works well for a platformer. Set BPM to around 120.
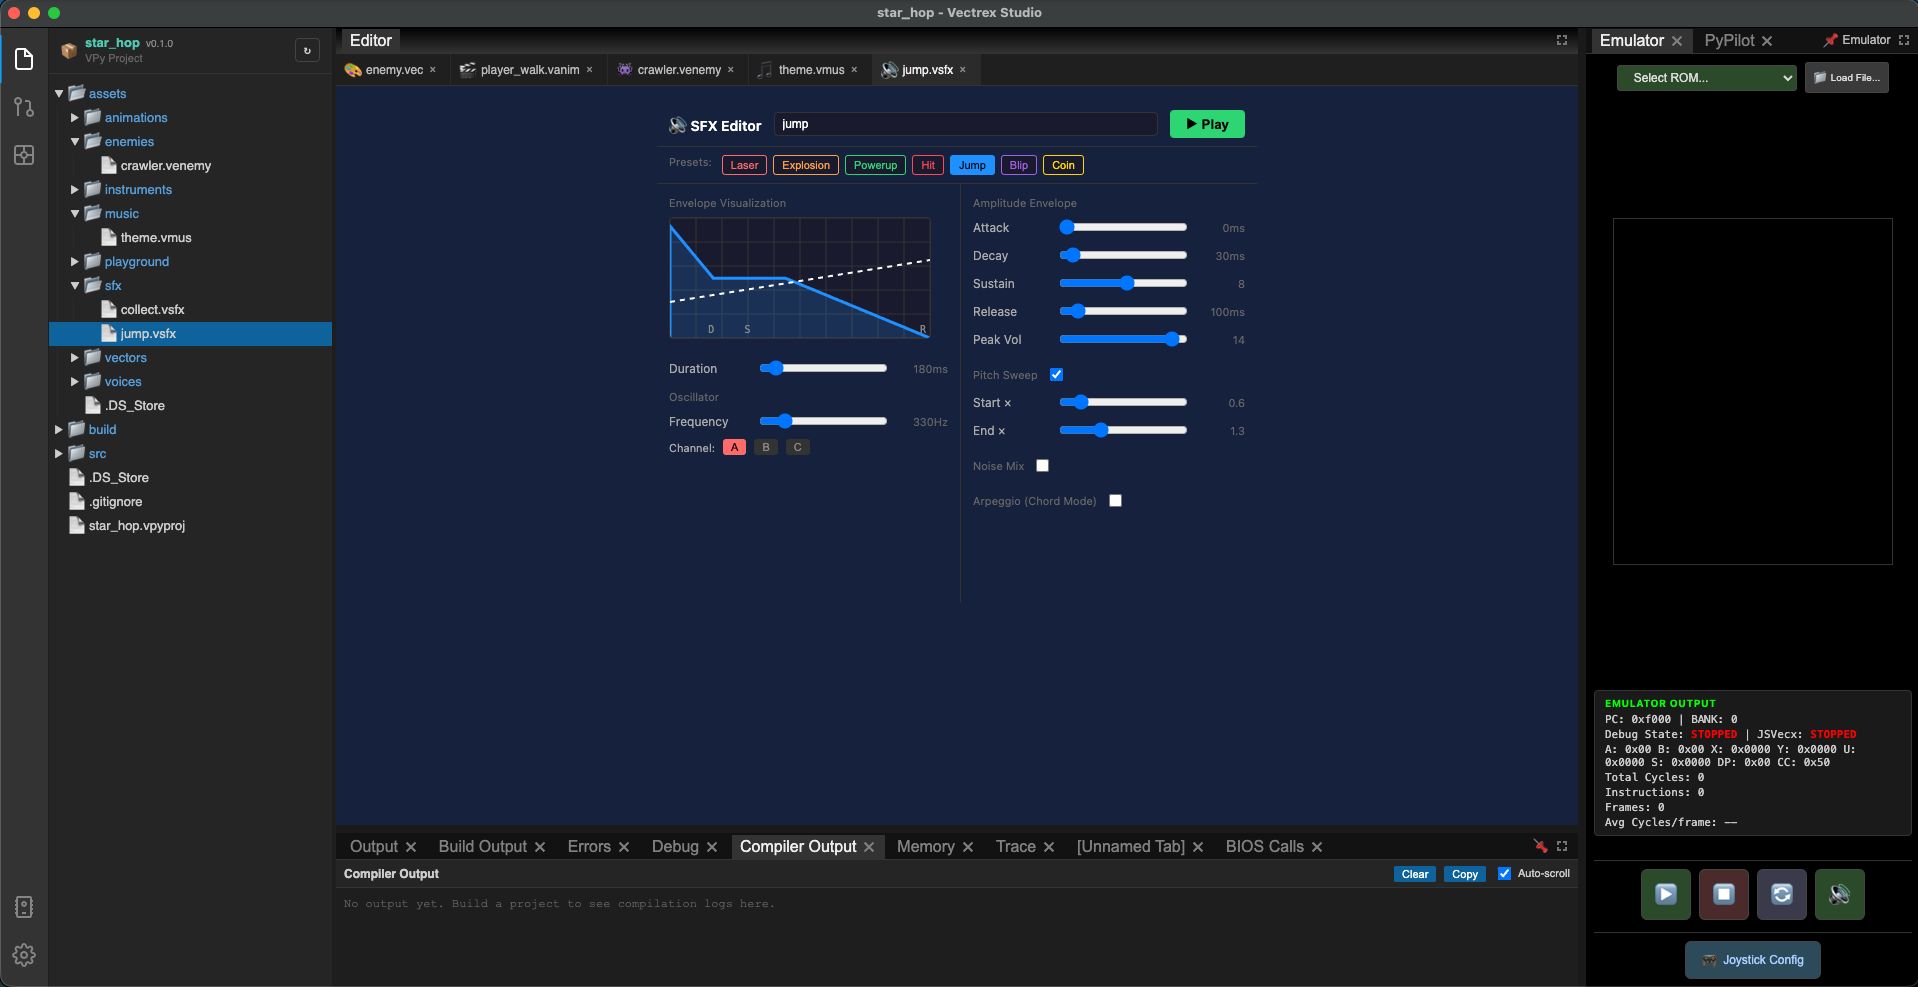
7. Create the sound effects
Create two sound effects via File → New → Sound Effect (.vsfx):
jump — a short upward pitch sweep. Set channel A, frequency starting around 80, sweeping down to 200 over 8 frames.
collect — a short bright arpeggio. Three fast notes ascending (e.g. periods 60, 45, 30) over 6 frames.
8. Write the game code
Open src/main.vpy. Write the complete game:
META TITLE = "STAR HOP"
META MUSIC = music1

# ── Game states ──────────────────────────────────────────────
const STATE_TITLE    = 0
const STATE_GAME     = 1
const STATE_GAMEOVER = 2

# ── Physics constants ─────────────────────────────────────────
const GRAVITY    = 1
const JUMP_VY    = 11
const MOVE_SPEED = 2
const MAX_FALL   = -15
const PLAYER_HH  = 12   # see section 11 — distance from drawn origin down to the feet

# ── World constants ───────────────────────────────────────────
const STAR_COUNT = 6

# ── Player ────────────────────────────────────────────────────
player_x: i16 = 0
player_y: i16 = 0
prev_player_y: i16 = 0
player_vy: i16 = 0
grounded: i8  = 0
facing: i8    = 1
walking: i8   = 0   # 1 while joystick is pushed sideways — drives the animation
spawn_floor_y: i16 = 0

# ── Camera ────────────────────────────────────────────────────
camera_x: i16 = 0

# ── Stars — positions match Playground placement ──────────────
# Do NOT place stars in the Playground; they are drawn by draw_stars()
# so the star_taken flag can hide collected ones.
const star_x = [10, 5, 90, 120, 200, 220]
const star_y = [-30, 20, -10, 0, 20, 28]
star_taken   = [0, 0, 0, 0, 0, 0]

# ── Score and state ───────────────────────────────────────────
score: i16 = 0
state: i16 = STATE_TITLE
hud_frame: i8 = 0   # toggle for skip-frame HUD (see section 13)


def main():
    SET_INTENSITY(127)
    LOAD_LEVEL("world_1")
    SPAWN_ENEMIES("world_1")
    PLAY_MUSIC("theme")
    spawn_floor_y = GET_LEVEL_FLOOR_Y() + PLAYER_HH
    player_y      = spawn_floor_y
    prev_player_y = spawn_floor_y


def loop():
    switch state:
        case STATE_TITLE:
            draw_title()
        case STATE_GAME:
            update()
            draw()
        case STATE_GAMEOVER:
            draw_gameover()


# ── Update ────────────────────────────────────────────────────

def update():
    update_player()
    check_stars()
    scroll_camera()
    UPDATE_ENEMIES()


def update_player():
    prev_player_y = player_y

    jx = J1_X()
    walking = 0

    if jx > 20:
        player_x += MOVE_SPEED
        facing = 1
        walking = 1
    if jx < -20:
        player_x -= MOVE_SPEED
        facing = -1
        walking = 1

    if J1_BUTTON_1() and grounded:
        player_vy = JUMP_VY
        grounded  = 0
        PLAY_SFX("jump")

    # While grounded: check if the player walked off the edge
    if grounded == 1:
        floor_y = LEVEL_COLLISION_Y(player_x, player_y, PLAYER_HH)
        if floor_y < spawn_floor_y:
            floor_y = spawn_floor_y
        if floor_y < player_y:
            grounded = 0

    # While airborne: apply gravity and land only when descending
    if grounded == 0:
        player_vy -= GRAVITY
        if player_vy < MAX_FALL:
            player_vy = MAX_FALL
        player_y += player_vy

        if player_vy < 0:
            floor_y = LEVEL_COLLISION_Y(player_x, prev_player_y, PLAYER_HH)
            if floor_y < spawn_floor_y:
                floor_y = spawn_floor_y
            if player_y <= floor_y:
                player_y  = floor_y
                player_vy = 0
                grounded  = 1

    # Fallback: never fall below spawn floor
    if player_y < spawn_floor_y:
        player_y  = spawn_floor_y
        player_vy = 0
        grounded  = 1

    player_x = clamp(player_x, -128, 260)


def scroll_camera():
    target   = player_x - 30
    camera_x = clamp(target, GET_SCROLL_LIMIT_LEFT(), GET_SCROLL_LIMIT_RIGHT())
    SET_CAMERA_X(camera_x)


def check_stars():
    for i in range(STAR_COUNT):
        if star_taken[i] == 0:
            dx = abs(player_x - star_x[i])
            dy = abs(player_y - star_y[i])
            if dx < 12 and dy < 12:
                star_taken[i] = 1
                score        += 1
                PLAY_SFX("collect")
                if score >= STAR_COUNT:
                    state = STATE_GAMEOVER


# ── Draw ──────────────────────────────────────────────────────

def draw():
    SHOW_LEVEL()
    draw_stars()
    DRAW_ENEMIES()
    draw_player()
    # Skip-frame HUD: refresh every other frame (~25 Hz). Static text is
    # imperceptible at 25 Hz on Vectrex phosphor and this halves the cost of
    # four PRINT_TEXT / PRINT_NUMBER calls. See section 13 for the rationale.
    hud_frame = 1 - hud_frame
    if hud_frame == 0:
        draw_hud()


def draw_player():
    screen_x = player_x - camera_x
    # Animate only while walking. When idle, draw the static body (no legs).
    # See section 15 for the rationale and how to add an idle-pose asset.
    if walking:
        if facing < 0:
            DRAW_ANIM("player_walk", screen_x, player_y, 1)   # mirror = 1
        else:
            DRAW_ANIM("player_walk", screen_x, player_y, 0)
    else:
        DRAW_VECTOR("player", screen_x, player_y)


def draw_stars():
    for i in range(STAR_COUNT):
        if star_taken[i] == 0:
            sx = star_x[i] - camera_x
            sy = star_y[i]
            DRAW_VECTOR("star", sx, sy)


def draw_hud():
    PRINT_TEXT(-120, 115, "STARS")
    PRINT_NUMBER(-70, 115, score)
    PRINT_TEXT(-10, 115, "/")
    PRINT_NUMBER(10, 115, STAR_COUNT)


# ── Screens ───────────────────────────────────────────────────

def draw_title():
    PRINT_TEXT(-40, 30, "STAR HOP")
    PRINT_TEXT(-75, 5, "COLLECT ALL STARS")
    PRINT_TEXT(-65, -15, "PRESS BUTTON 1")
    if J1_BUTTON_1():
        state = STATE_GAME


def draw_gameover():
    PRINT_TEXT(-45, 30, "YOU WIN!")
    PRINT_TEXT(-35, 5, "SCORE")
    PRINT_NUMBER(20, 5, score)
    PRINT_TEXT(-65, -15, "PRESS BUTTON 1")
    if J1_BUTTON_1():
        reset_game()


def reset_game():
    player_vy = 0
    grounded  = 0
    facing    = 1
    walking   = 0
    score     = 0
    camera_x  = 0
    for i in range(STAR_COUNT):
        star_taken[i] = 0
    LOAD_LEVEL("world_1")
    SPAWN_ENEMIES("world_1")
    spawn_floor_y = GET_LEVEL_FLOOR_Y() + PLAYER_HH
    player_x      = 0
    player_y      = spawn_floor_y
    prev_player_y = spawn_floor_y
    state = STATE_TITLE
9. Build and run
Press F7 to build. The Build Output panel at the bottom shows the compiler progress through all 9 phases. A successful build ends with:
✓ Phase 8 complete — build/star_hop.bin (12 KB)
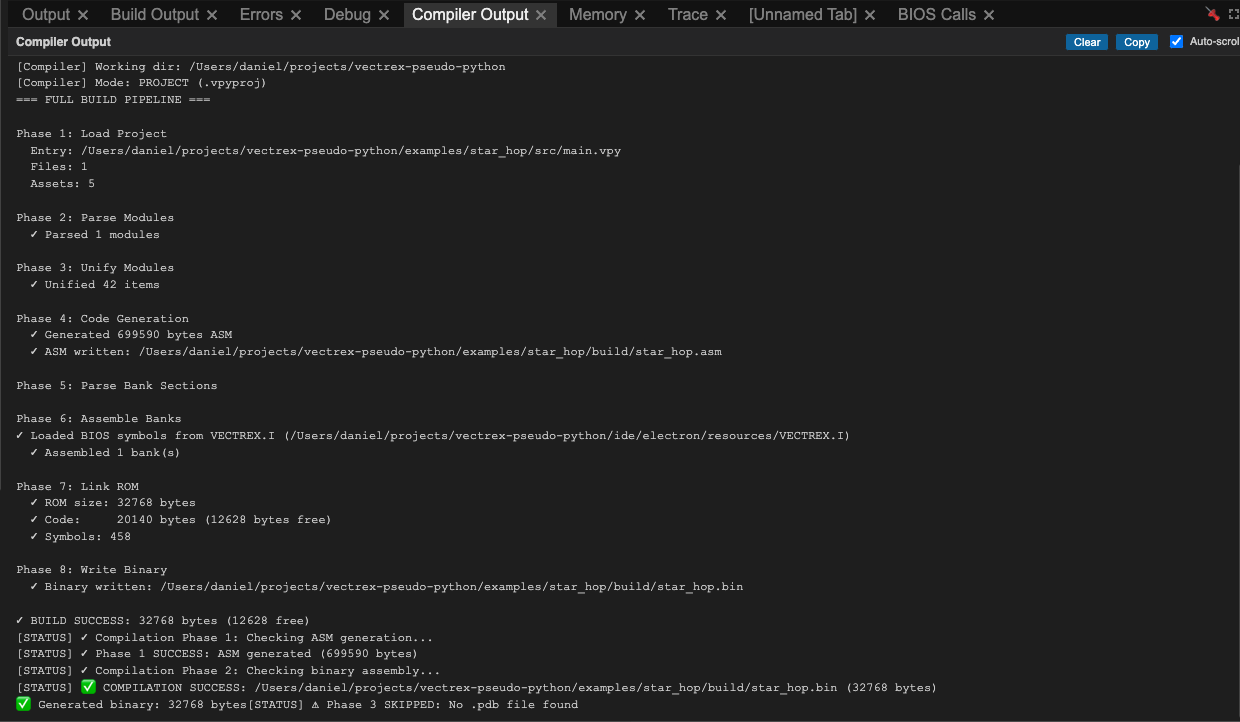
The ROM loads automatically in the emulator panel. You should see the title screen.

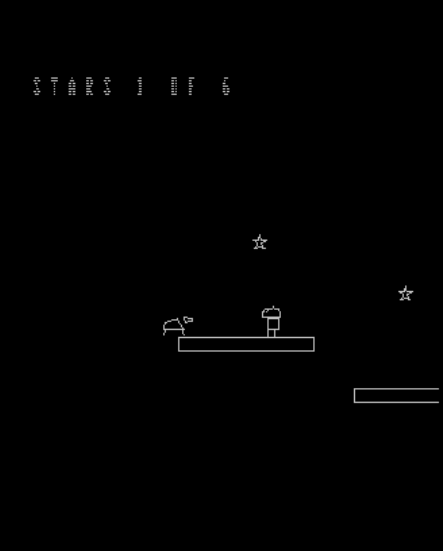
Press Button 1 on the emulated gamepad. The level loads and the player appears on the left side of the screen. Walk right with the joystick, jump with Button 1, collect stars, and the camera scrolls to follow you.
10. How the scrolling works
The camera logic is worth understanding because it is the most common point of confusion for new Vectrex developers.
The Vectrex screen coordinates go from roughly −128 to +127 on both axes. When your level is wider than that, you need to translate world coordinates to screen coordinates before drawing.
SET_CAMERA_X(camera_x) tells SHOW_LEVEL() to subtract camera_x from every object's X before rendering. You are responsible for doing the same subtraction for anything you draw manually — stars, player, enemies drawn with DRAW_VECTOR:
# World position → screen position
screen_x = world_x - camera_x
DRAW_VECTOR("star", screen_x, world_y)
DRAW_ENEMIES() handles this automatically — the enemy system reads the current camera offset internally.
The GET_SCROLL_LIMIT_LEFT() and GET_SCROLL_LIMIT_RIGHT() calls read the boundary values you set with the scroll markers in the Playground. This prevents the camera from going past the edges of the level, so the player never sees blank space.
def scroll_camera():
    target   = player_x - 30        # keep player 30 units right of left edge
    camera_x = clamp(target, GET_SCROLL_LIMIT_LEFT(), GET_SCROLL_LIMIT_RIGHT())
    SET_CAMERA_X(camera_x)
11. How the enemy works
SPAWN_ENEMIES("world_1") is called once — in main() after LOAD_LEVEL(). It reads every enemy spawn point in the level and initialises the enemy pool. Calling it every frame would reset every enemy to its spawn position each frame, which is why the enemy would appear frozen.
UPDATE_ENEMIES() advances the AI each frame and is called in update(). DRAW_ENEMIES() renders each active enemy and is called in draw(), applying the camera offset automatically so enemies move correctly with the scroll.
The crawler is configured as a wander enemy with no explicit waypoints. At compile time, the compiler finds the walkable area on the platform closest to the spawn point and generates two patrol waypoints at its left and right edges. The enemy walks between those two points and reverses indefinitely — entirely driven by the runtime, with no per-frame logic in your code.
If you want an enemy to follow a custom route instead, add explicit waypoints to the spawn point in the Playground. The compiler uses those directly and skips the auto-derivation.
12. How platform collision works
The physics separates grounded and airborne states explicitly, following the same pattern used by all built-in VPy platformer examples.
Spawn floor. GET_LEVEL_FLOOR_Y() reads the groundBottomOffset value from the level header (set in the Playground's level properties — 33 for Star Hop) and returns camera_y - 128 + groundBottomOffset. This is the Y coordinate of the absolute floor. spawn_floor_y = GET_LEVEL_FLOOR_Y() + PLAYER_HH is computed once at level load and used as both the starting position and the fallback floor.
Grounded check. Each frame while the player is on the ground, LEVEL_COLLISION_Y checks whether there is still a surface below the current position. If the player walks off a platform edge, the returned floor will be lower than player_y, and grounded is cleared to start freefall.
Landing — descent only. While airborne, LEVEL_COLLISION_Y is called only when player_vy < 0 (i.e. falling). This prevents the ceiling of a platform from snapping the player downward on the way up. The function receives prev_player_y — the position from before this frame's physics — so a fast fall can't tunnel through a thin platform in a single step.
Fallback floor. After all collision logic, if player_y is still below spawn_floor_y, the player is snapped back to the floor. This is a safety net for edge cases where there is no collidable surface at the player's X position.
# Grounded: check for walkoff
if grounded == 1:
    floor_y = LEVEL_COLLISION_Y(player_x, player_y, PLAYER_HH)
    if floor_y < spawn_floor_y:
        floor_y = spawn_floor_y
    if floor_y < player_y:
        grounded = 0

# Airborne: gravity + land on descent only
if grounded == 0:
    player_vy -= GRAVITY
    if player_vy < MAX_FALL:
        player_vy = MAX_FALL
    player_y += player_vy
    if player_vy < 0:
        floor_y = LEVEL_COLLISION_Y(player_x, prev_player_y, PLAYER_HH)
        if floor_y < spawn_floor_y:
            floor_y = spawn_floor_y
        if player_y <= floor_y:
            player_y = floor_y
            player_vy = 0
            grounded  = 1

# Safety net
if player_y < spawn_floor_y:
    player_y = spawn_floor_y
    player_vy = 0
    grounded  = 1
13. Performance tip: skip-frame HUD
The Vectrex frame budget is roughly 30 000 CPU cycles at 50 Hz. Drawing the HUD with PRINT_TEXT + PRINT_NUMBER four times costs about 3 500 cycles per frame — over 10% of the budget for content that does not change every tick.
The pattern used in draw() is a one-line optimisation:
hud_frame = 1 - hud_frame
if hud_frame == 0:
    draw_hud()
draw_hud() runs every other frame, dropping its effective refresh from 50 Hz to 25 Hz. On a Vectrex CRT the phosphor persistence smooths over the missing frame and the text looks identical. The saving — about 1 750 cycles per frame on average — is enough to keep busy levels from skipping.
This trick applies to anything static: score, lives counter, level number, debug overlays. Things that change continuously (player position, enemy animation, collision flashes) should still draw every frame.
14. Asset origin and PLAYER_HH
A subtle but important point that catches everyone the first time: the origin of a .vec asset is wherever you drew it, and the game code has to know where that origin sits relative to the character's feet.
In Star Hop, DRAW_VECTOR("player", screen_x, player_y) and DRAW_ANIM("player_walk", screen_x, player_y, ...) both render the asset with its origin at (screen_x, player_y). The asset's own coordinates are added to that point.
If you drew the body of player.vec with all points at positive y (above the editor's origin line), the origin sits at the character's feet. With that convention you want player_y = floor + 0 — the character stands directly on the floor.
In our walk animation, we drew the legs at negative y (below the origin):
left  leg: (-2, -8) → (-2, -12)
right leg: ( 2, -8) → ( 2, -12)
That means the feet are 12 units below the drawn origin. To stand on the floor we need to lift the drawn origin 12 units up, so spawn_floor_y = GET_LEVEL_FLOOR_Y() + 12. That's why PLAYER_HH = 12 in the constants block.
The same offset is used in collision queries: LEVEL_COLLISION_Y(player_x, player_y, PLAYER_HH) tells the engine "my feet are PLAYER_HH units below player_y, find the floor there." Get this wrong and the player floats above or sinks into the platform.
Rule of thumb. Set PLAYER_HH to the distance from the drawn origin down to the lowest visible point of the character. If you redesign the legs or add a base, update PLAYER_HH to match.
15. Animation state — walking vs idle
Calling DRAW_ANIM every frame is the simplest way to play an animation, but it has a side effect: the frame counter advances on every call regardless of whether the character is actually moving. The legs keep stepping even when the joystick is at rest.
Star Hop tracks a walking flag in update_player() and uses it to pick the draw call:
walking: i8 = 0

def update_player():
    jx = J1_X()
    walking = 0                # reset every frame
    if jx > 20:
        player_x += MOVE_SPEED
        facing = 1
        walking = 1
    if jx < -20:
        player_x -= MOVE_SPEED
        facing = -1
        walking = 1
    ...

def draw_player():
    screen_x = player_x - camera_x
    if walking:
        if facing < 0:
            DRAW_ANIM("player_walk", screen_x, player_y, 1)
        else:
            DRAW_ANIM("player_walk", screen_x, player_y, 0)
    else:
        DRAW_VECTOR("player", screen_x, player_y)
When idle, only player.vec (the body) draws — the legs disappear. This is functional and tutorial-friendly, but visually a little abrupt.
For a richer idle pose, create a player_idle.vec that contains the body plus legs in a resting stance (the same shape as the walk animation's frame 0 works well). Then swap the idle branch:
    else:
        DRAW_VECTOR("player_idle", screen_x, player_y)
That keeps the legs always visible — animated while walking, static while standing.
⚠️ Avoid using a second
DRAW_ANIM("player_idle", ...)call as the idle pose on the PiTrex / RP2350 targets. Both backends currently share a single animation state buffer across allDRAW_ANIMcallsites, so two distinct animations interleaved in the same frame will corrupt each other's frame counter. M6809 uses per-animation state and is unaffected. PlainDRAW_VECTORfor the idle pose dodges this entirely.
16. What to try next
You now have a working game. A few directions to explore from here:
Animate other sprites. Apply the same base_refs + vec_refs pattern to the enemy (crawler_walk) or to a star pickup effect. The compiler advances frames automatically based on each frame's duration_ticks — no per-frame timing code in your game logic.
Add enemy interaction. Check each frame whether the player overlaps an active enemy, and call draw_gameover() if they do:
def check_enemy_collision():
    for i in range(8):   # enemy pool size
        ex = GET_ENEMY_X(i)
        ey = GET_ENEMY_Y(i)
        dx = abs(player_x - ex)
        dy = abs(player_y - ey)
        if dx < 15 and dy < 20:
            state = STATE_GAMEOVER
Add a second level. Create world_2.vplay in the Playground. When score >= STAR_COUNT, instead of going to game-over, load the next level with LOAD_LEVEL("world_2") and reset the star arrays.
Go multibank. If your game grows beyond 32 KB, add two META lines and the compiler handles the rest automatically:
META ROM_TOTAL_SIZE = 65536
META ROM_BANK_SIZE  = 16384
Try PiTrex. Change target = "pitrex" in your .vpyproj, rebuild, and the same VPy code runs on a Raspberry Pi Zero inside the Vectrex at full ARM speed.
Complete file listing
star_hop/
├── star_hop.vpyproj
├── src/
│   └── main.vpy
├── assets/
│   ├── vectors/
│   │   ├── player.vec
│   │   ├── platform.vec
│   │   ├── star.vec
│   │   └── enemy.vec
│   ├── animations/
│   │   └── player_walk.vanim
│   ├── enemies/
│   │   └── crawler.venemy
│   ├── music/
│   │   └── theme.vmus
│   ├── sfx/
│   │   ├── jump.vsfx
│   │   └── collect.vsfx
│   └── levels/
│       └── world_1.vplay
└── build/
    └── star_hop.bin